Google is the biggest search engine ad platform in the world. But Microsoft Advertising has potential advantages, including lower CPCs and less competition on Bing.
Table of contents
It’s worth a look, and this article shows you how to get started. I’ll walk through the step-by-step process to set up Microsoft Ads as well as best practices for running campaigns.
How to set up your Microsoft Ads account
The first step is to create an account on Microsoft Advertising.

When first creating your Microsoft Advertising account, you have the option of importing campaigns from Google. If you don’t currently have any Google campaigns or simply want to start fresh, proceed with “Create a new campaign.”
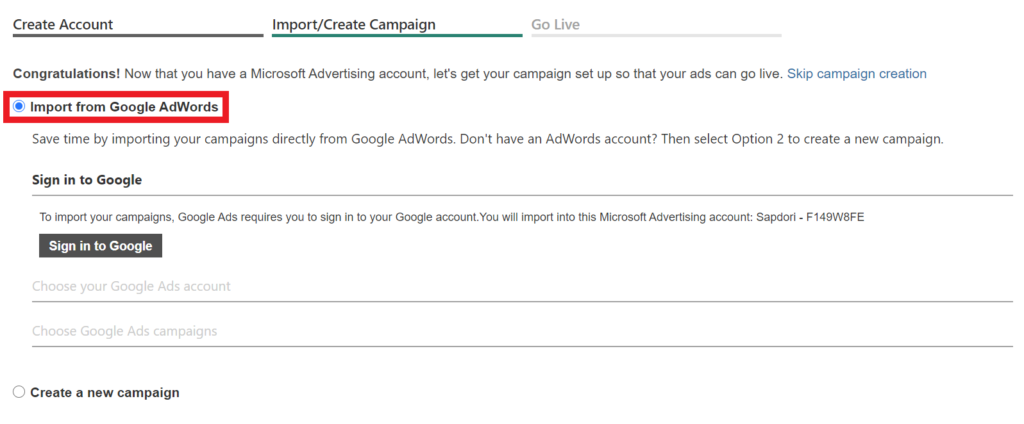
You can create an ad campaign during the account creation process, but I recommend skipping for now.

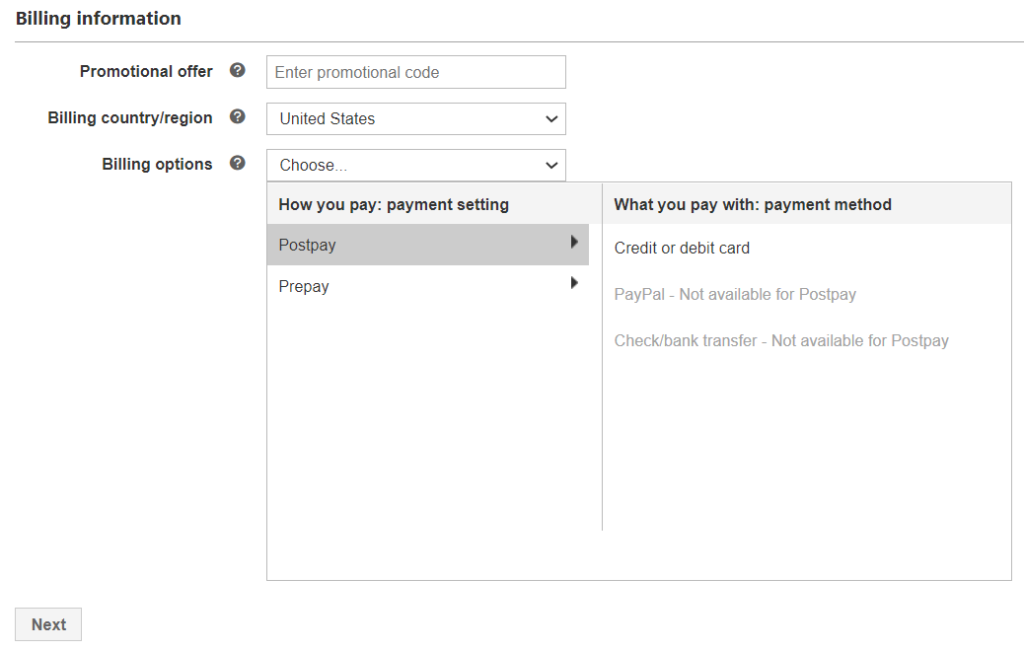
Next, add your billing information. There are two ways to pay for ads:
- Prepay allows you to add funds to your account and have charges deducted from those funds. You have the option to pay with PayPal, check/bank transfer, or credit/debit card.
- Postpay option allows you to pay after charges accrue. You must use a credit/debit card for the postpay option.
If you want to skip the add payment option, you can come back to it later.

That’s it. You just created your account.
How to set up a Microsoft Ads campaign
First, go to the “Campaigns” tab and click on the “Create campaign” button:
Campaign goals
You have six options for your campaign goal:
- Visits to my website. Choose this option if your main goal is to drive traffic to your website.
- Visits to my business location. Select this goal if you have a brick-and-mortar business, and you want people to visit your store, office, or event.
- Conversions. Pick this option if you want to track the actions people take on your website, such as purchasing a product or signing up for your email list.
- Phone calls. Use this option to drive more phone calls to your business.
- Dynamic Search Ads. With dynamic search ads, your ads are automatically customized based on the content of your site; you don’t even choose keywords for your campaign. Check out this article to learn when dynamic search ads may make sense.
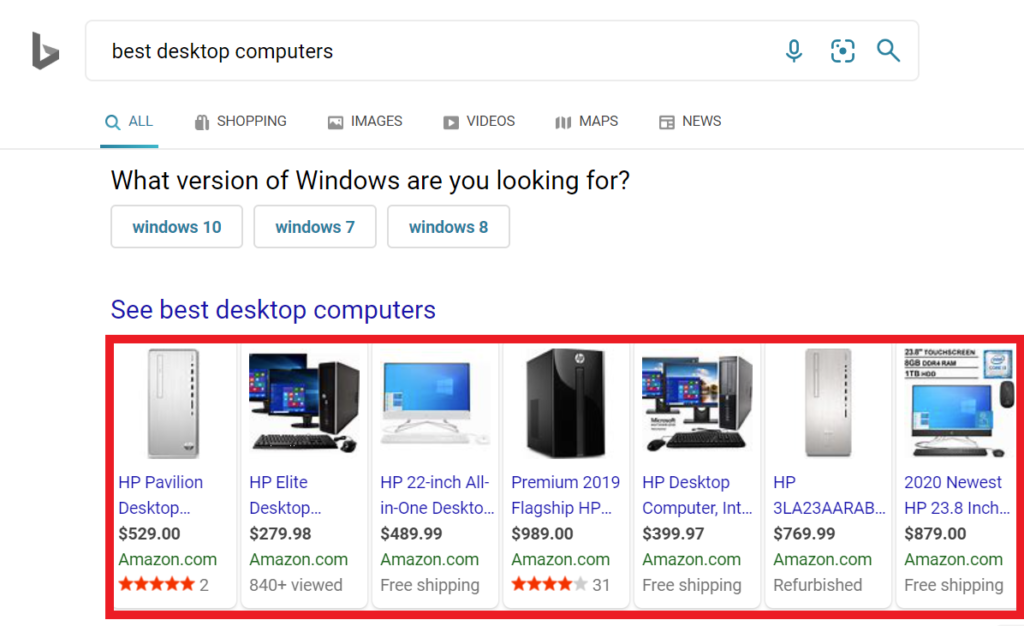
- Sell products from your catalog. Showcase your inventory with product images on the search results page. This feature is equivalent to Google Shopping.
Campaign settings
Next, it’s time to define your campaign settings.
- Campaign name. It’s important to name your campaigns sensibly, especially if you’ll be running a large number of campaigns within your account. Here’s an excellent guide that covers best practices for naming your campaigns.
- Campaign budget. Here, you can set how much money you’re willing to spend per day on your ads. Learn more about how your budget is calculated here.
- Location. You can set locations for your ads based on a country or you choose states, cities, coordinates, or zip codes you want to target. Additionally, you can exclude locations you don’t want to target.
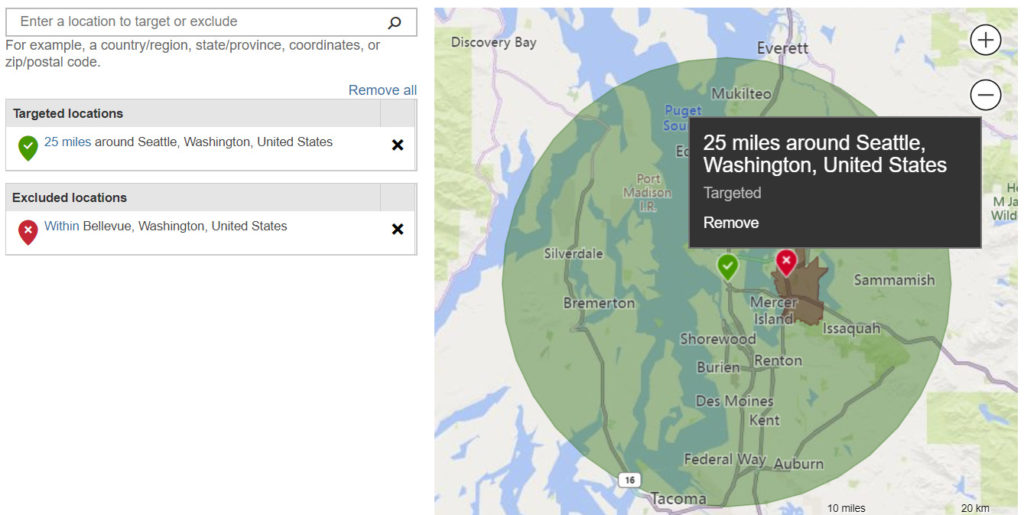
- Who should see your ads. If you want to show ads to people who live in your target location, check “People in your targeted location.” In most cases, you wouldn’t check “People searching for or viewing pages about your targeted location,” although there are exceptions (e.g., tour business).
- Language. Select a language consistent with your location targeting.
Ad groups and keywords
The next step is to name your ad group and choose the right keywords for your ads.

You probably noticed the plus sign in front of each word in the image above. That’s called a broad match modifier, and it’s one of four match types:
- Broad match. With a broad match type, someone could type your keywords out of order in the search bar, and your ads will still display. Your ads also show if the searched words are loosely related to your keywords, even if they don’t exactly match (hence “broad” match). Broad match will generally generate the most traffic, but your ads will be less targeted.
- Broad match modifier. When you use broad match modifier keywords, your keywords must be in the search query, although the order can differ. You will get less, but more relevant, traffic.
- Phrase match. Phrase match keywords generally bring highly targeted traffic to your website since the search query has to contain all of your keywords in the exact order they’re written. You also get exposure to new audiences who type in long-tail keywords that contain your keywords.
- Exact match. The exact match requires the search query to match your keywords with no deviation, and the search query can contain no other words. Exact match is the most targeted but will provide the least traffic.

To learn more about each match type, here’s a great guide.
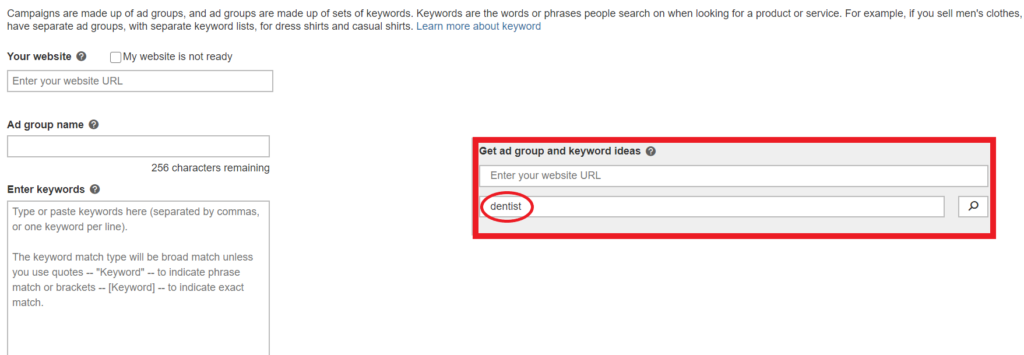
If you need inspiration for keyword ideas, use tools such as Wordtracker, SEMrush, Adzooma, or Moz.

Once you’ve chosen your keywords, click “Save.” Next, we’ll get into the ad creation process.
Ads
Click on “Create ad.”

Next, fill in the following information:
- Ad type. Choose between expanded text ads and responsive search ads. If you go with expanded text ads, you have to write your own headline and description for each ad you create. With responsive search ads, Microsoft Advertising automatically combines headlines and descriptions.
- Final URL. Enter the URL of your landing page.
- Title part 1. People usually notice your title first to decide if your ad is relevant. It’s a good idea to include keywords in your title.
- Title part 2. This is a subheading for your ad, separated from the first title by a vertical bar.
- Title part 3. The last title is less important and may not appear in your ad at all, but it still provides helpful context.
- Path. Name your path with relevant keywords. For example, if you’re a dentist, you may name your first path as “teeth” and the second path as “whitening,” so the path is relevant to the search query. Your display URL will show as “domain.com/teeth/whitening.” Each path comes with a 15-character limit.
- Ad text 1. Include important information with your first ad tex. If you want examples of good PPC ad copy (with explanations), check out this article.
- Ad text 2. The second ad text is not guaranteed to show in your ads.
- Mobile URL. This should be the same as your final URL unless you have a different URL for mobile users.

This is how your ad appears to search users.

How to use dynamic keyword insertion
If you type “{“ into any of the title boxes, you have the option to choose “Keyword insertion.”

The keyword insertion function matches the exact keyword someone typed in. For example, say you have keywords that include teeth whitening and dental bleaching, and you set your title as “Book Your {keyword: dental} Appointment Today.”
When someone types in “dental bleaching,” your ad displays as “Book Your Dental Bleaching Appointment today.” When the searcher’s keyword cannot be displayed in ads, your ad automatically displays default text (e.g., “Book Your Dental Appointment Today”).
(For your default text, choose something general that works for multiple scenarios.)

Ad Extensions
There are nine core ad extensions, some of which are unique to Microsoft Ads. (There’s also a tenth extension to promote app downloads, if you have an app.)
1. Action extensions
These allow you to embed a call-to-action button to your ads, which can help increase the click-through-rate of your ads.


2. Price extensions
With price extensions, people can see sample prices before they click. Price extensions help can increase the relevance and improve conversions of your ads.

3. Sitelink extensions
Sitelink extensions allow you to include additional links to specific products or offers. They significantly increase the surface area of your ads, which can drive more clicks.

4. Callout extensions
Callout extensions also increase the screen space of your ads. You can use them to highlight product features or benefits. But, unlike sitelink extensions, callout extensions don’t add additional links to your ads.

5. Structured snippet extensions
With structured snippet extensions, you can highlight aspects of your product or service. A structured snippet contains a header and a list of 2–10 words that relate to the header. For example, if your header is “services,” then the words that relate to your header may be “oil change” and “brake repair.”

6. Review extensions
Review extensions allow you to display customer reviews on your ads “from reliable, well-established and trusted sources.” For more information on Microsoft’s review extension policies, click here.

7. Location extensions
These are useful if you own a brick-and-mortar business. With location extensions, you can add the physical location of your business for easy reference (instead of forcing potential customers to click your ad just to find your address).

8. Call extensions
Call extensions display your phone number on your ads. Your phone number can be displayed on all devices, including PCs, tablets, and smartphones. On PCs and tablets, people can make calls by using a free Skype call, which is an exclusive feature of Microsoft Ads.
On smartphones, people can make calls by tapping on your number. According to Microsoft, ads with call extensions have a 3–6% higher click rate than ads that don’t.

9. Image extensions
With image extensions, your search ads have a chance to appear on non-search placements.
There are a few requirements for images that you can use in ads:
- Minimum image dimensions: 760 x 400 pixels;
- Maximum image dimensions: 1,900 x 1,000 pixels;
- Required aspect ratio: 16:9;
- File types eligible: .jpeg, .png, and .gif.
The next step is to set your budget and bids.
Budget
Your budget comes down to how much you’re comfortable spending and the industry you’re in. Know what kind of CPC you’re looking at before you commit to a paid strategy.

To help get you started, Microsoft Advertising provides suggested bids when choosing keywords. It’s their estimate of how much you’ll have to spend to show up on the front page of Bing.
This bid is just an estimate. Keep a close eye on how your campaign performs and adjust your bids accordingly.


Bid strategy
There are three main bid strategies:
- Manual: With a manual bid, you set bids for your ad groups and keywords, and these bids are set in stone unless you change them.
- Enhanced CPC: With Enhanced CPC, you set your bid manually, and Microsoft Ads automatically increases or decreases your bid when the conversion is more likely. Enhanced CPC ads come with certain geographic restrictions.
- Maximize clicks: Your bid is set automatically to a number that maximizes clicks while staying within your set budget. (You have an option to set a maximum CPC.)
While automated ads can save time, the tradeoff is you have much less control. And despite their potential, PPC automation isn’t guaranteed to outperform manual bids.

Conversion Tracking
You can only optimize what you measure, but conversion tracking is also vital to automation. Many Microsoft Ads features depend on the volume and quality of data from conversion tracking.
How to set up conversion tracking
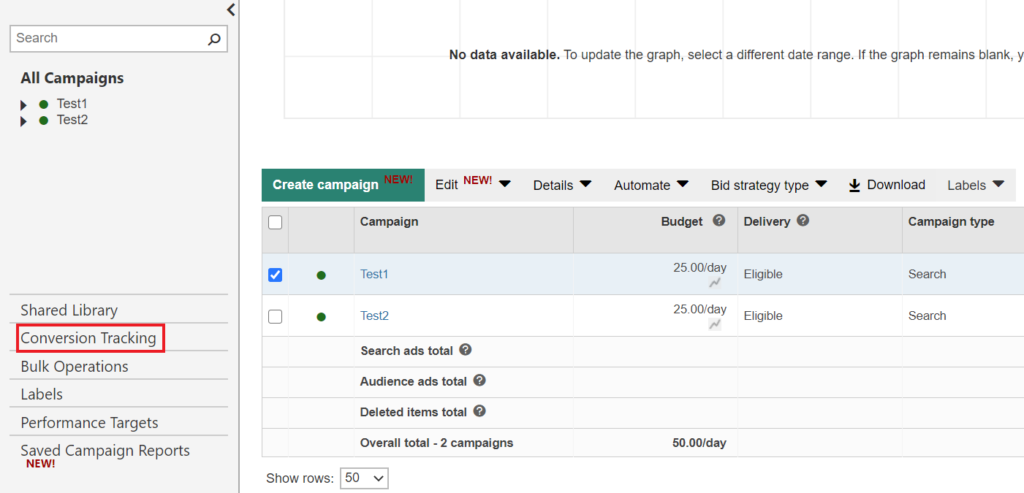
Click on “Conversion Tracking.”
Then, click “Get started.”
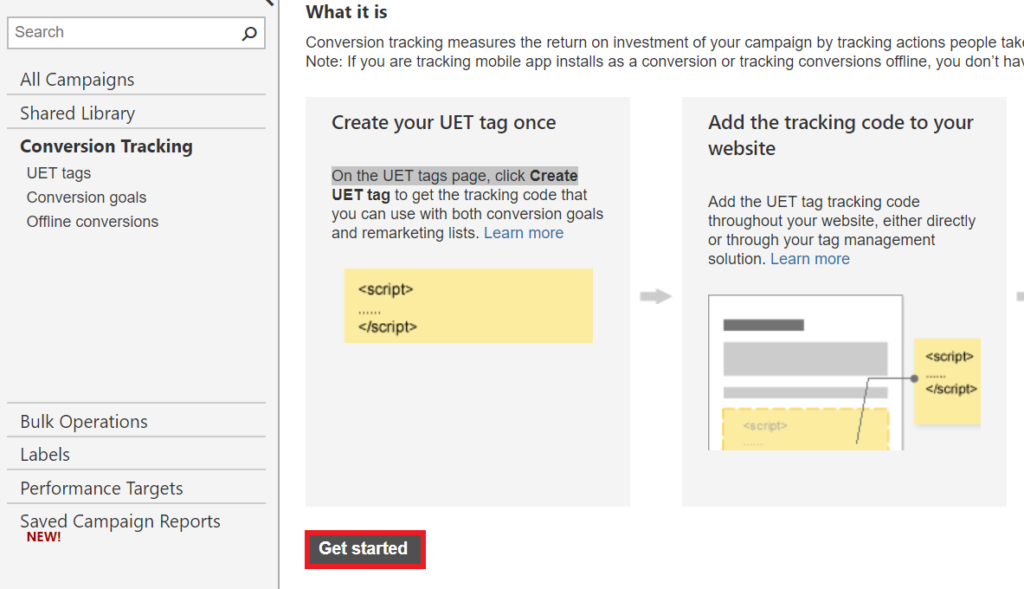
Next, click on “Create UET Tag.”
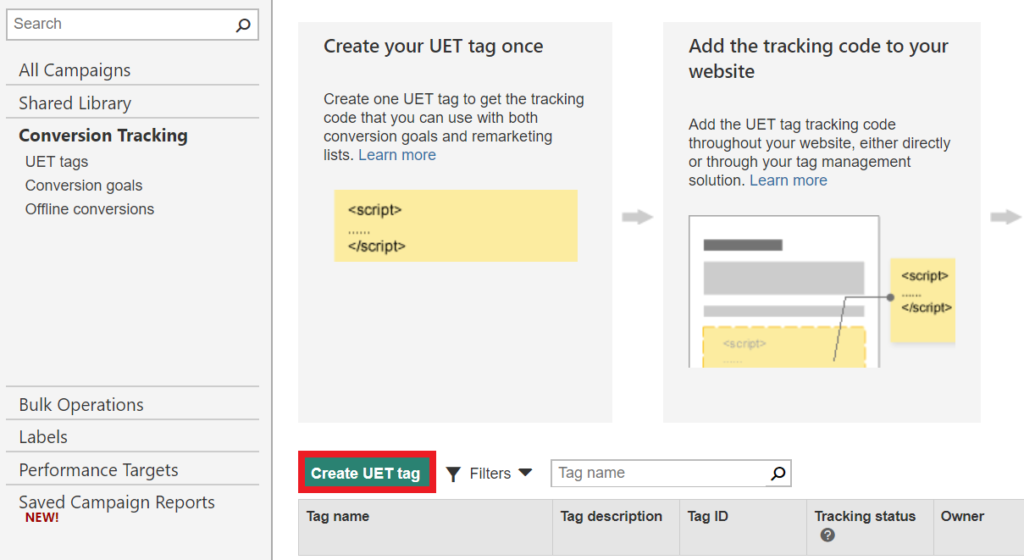
Fill in the “UET tag name” section. For your description, it’s recommended to either write the name of your page or page URL.

In the following steps, I’ll set up a UET tag using Google Tag Manager (GTM), though there are other ways to implement the tag on your site.
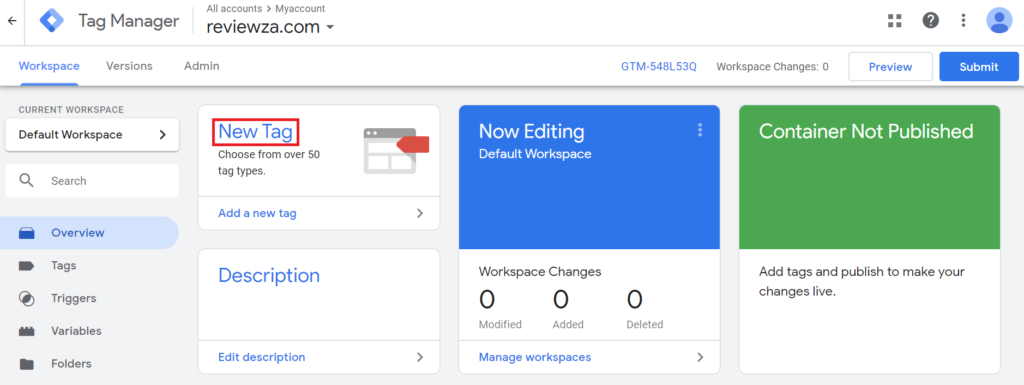
Go into your GTM container and click on “New Tag.”
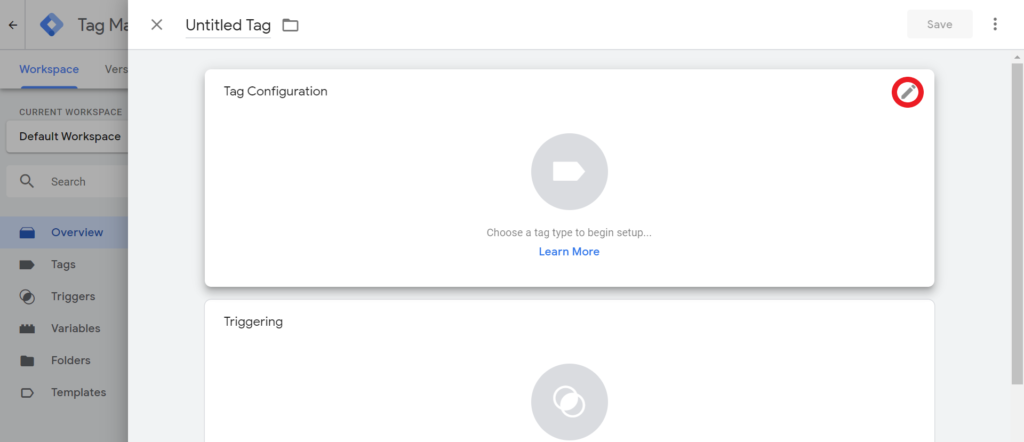
Next, click on the pencil icon in the Tag Configuration.
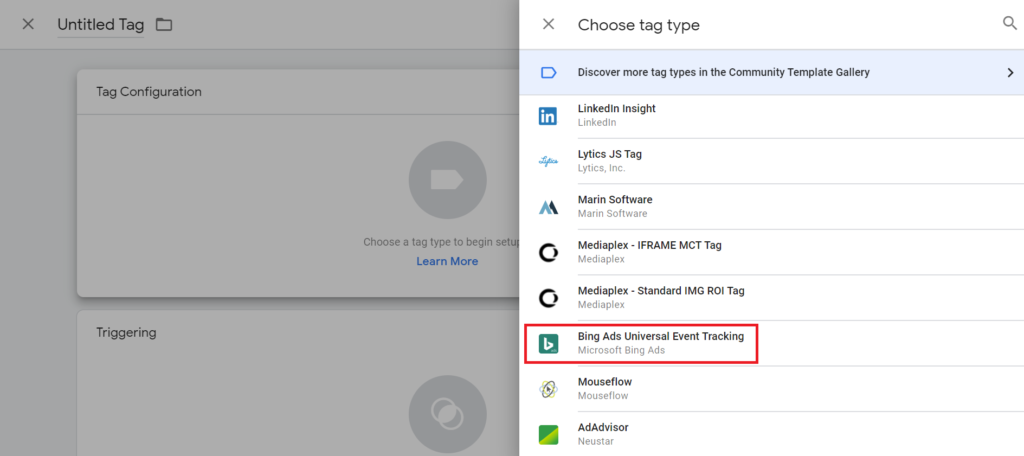
Scroll down and click on “Bing Ads Universal Event Tracking.”
Go to your Microsoft Ads account and click on “UET Tags” under “Conversion Tracking.” Copy the Tag ID from your UET Tag.
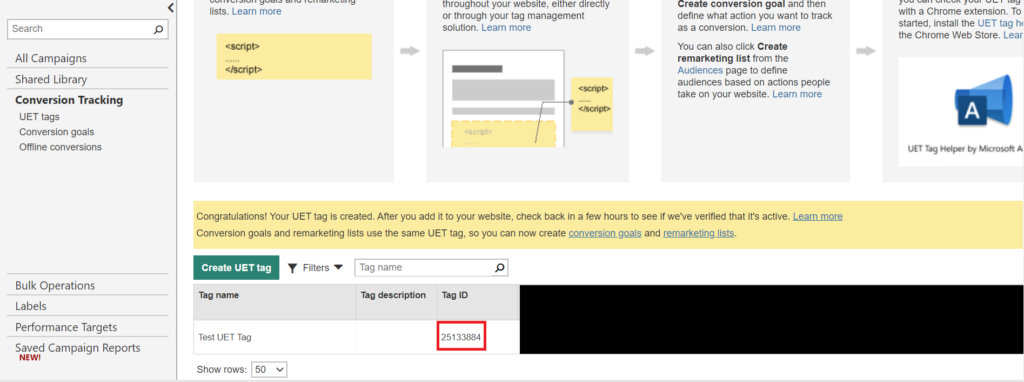
Go back to GTM and paste the Tag ID into the “Bing Ads UET Tag ID” section.
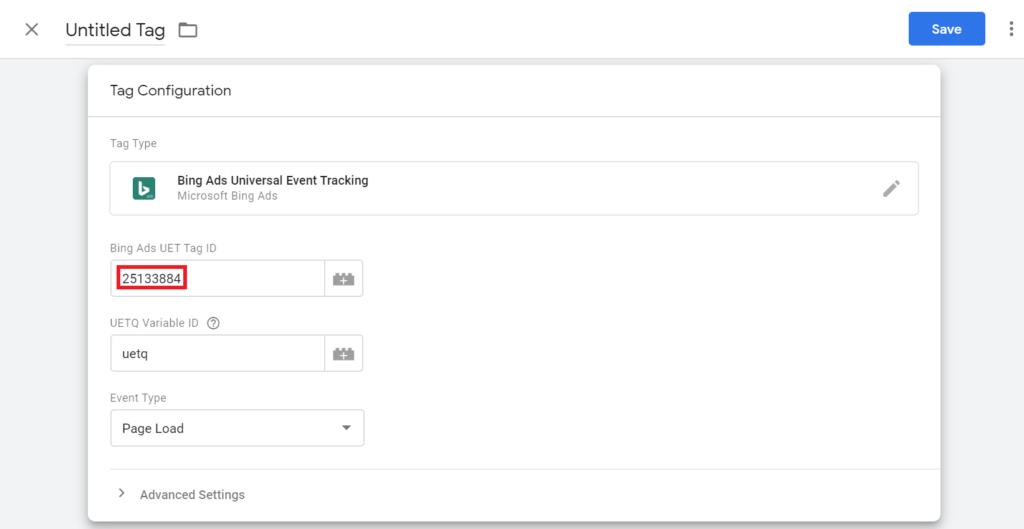
Click the pencil icon in the triggering pane.
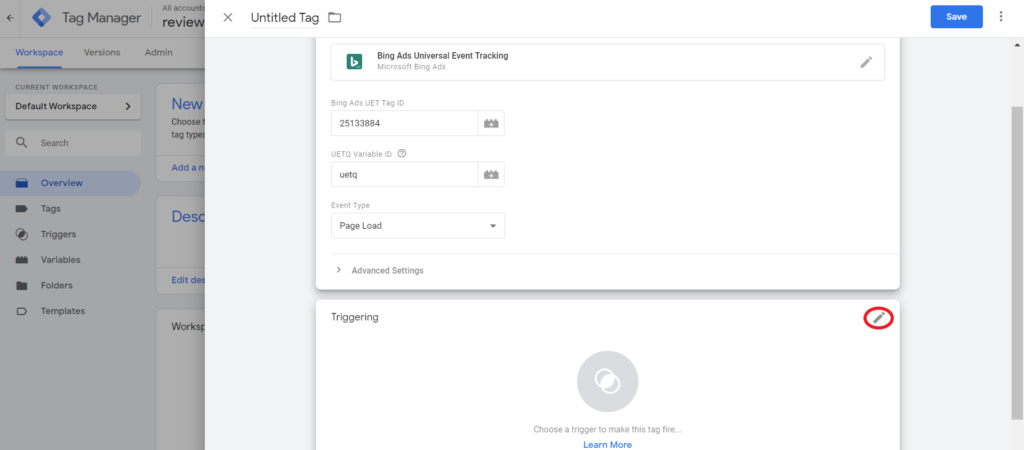
Select All Pages and click Add

Enter a tag name and click Save.
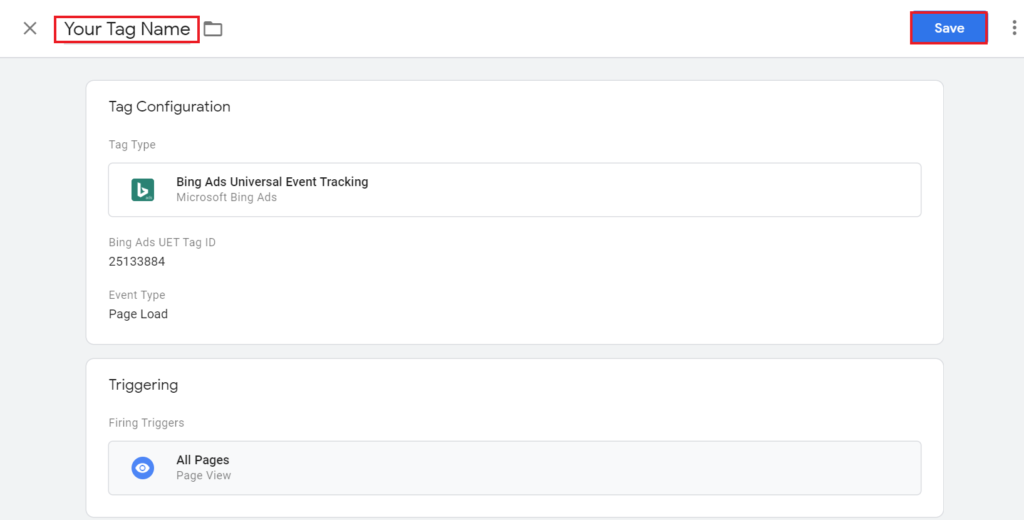
Click on Submit.
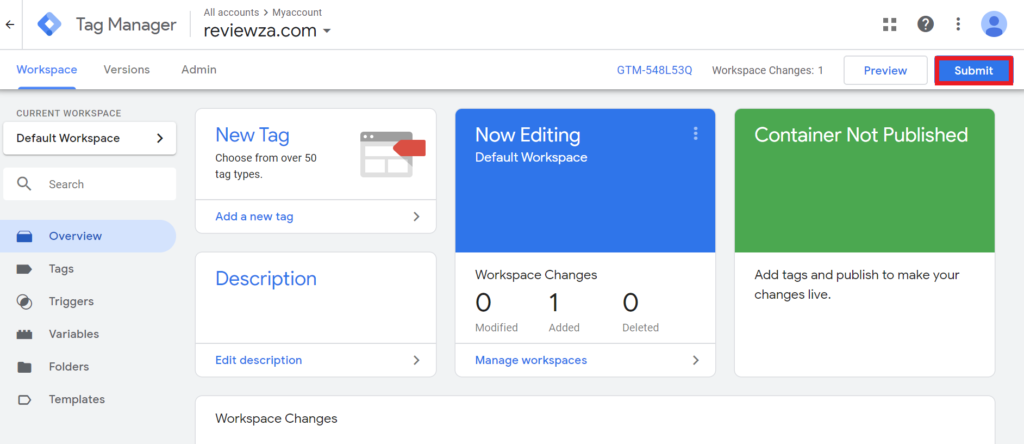
Finally, click on Publish.

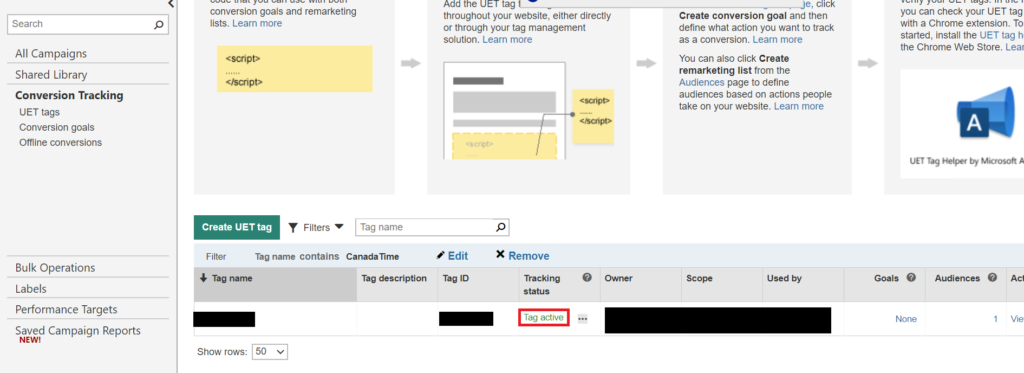
You should see your tag verified under the UET tags pane in your Microsoft Advertising account within 24 hours.
Conversion goals
After you’ve added conversion tracking for your website, create conversion goals.
How To Set Up Conversion Goals
Go to “Conversion goals” and click on “Create conversion goal”:

Name the conversion goal and select a goal that best describes the measure you want to track.
We’ll walk through an example based on a destination URL (e.g., “thank you” page).
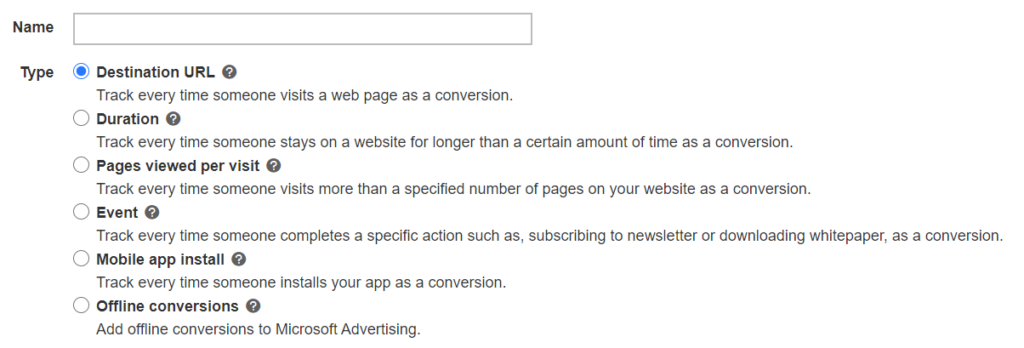
Add the destination URL to ensure your conversion gets recorded when the customer reaches, in this example, your thank you page.

For destination URLs, you have four options, similar to what you see in Google Analytics Goals:
- Equals to. The URL that users visit has to exactly match your destination URL to count as a conversion.
- Begins with. Any visit to a page that begins with your URL will count as a conversion. For example, “abc.com/example/abcd” will be recorded as the conversion if your destination URL is set to “abc.com/example/.”
- Contains. Any visit to a site that contains your URL or keywords will count as a conversion. For example, if you set your destination URL to “thank-you,” then both “abc.com/thank-you” and “abc.com/example/thank-you” will count as conversions.
- Regular expression. This is a useful option if you’re trying to track a purchase for a specific product. For in-depth details, check out this page.
Once you set your destination URL, you can fill in the rest of the information, and click on save to complete the process. If you need additional help, check out Microsoft’s guide on creating conversion goals.
Remarketing with Microsoft Ads
Remarketing can substantially increase your conversion rate for paid search marketing. It’s a way to re-engage website visitors who have visited your site but not yet converted.
How to create a remarketing list in Microsoft Ads
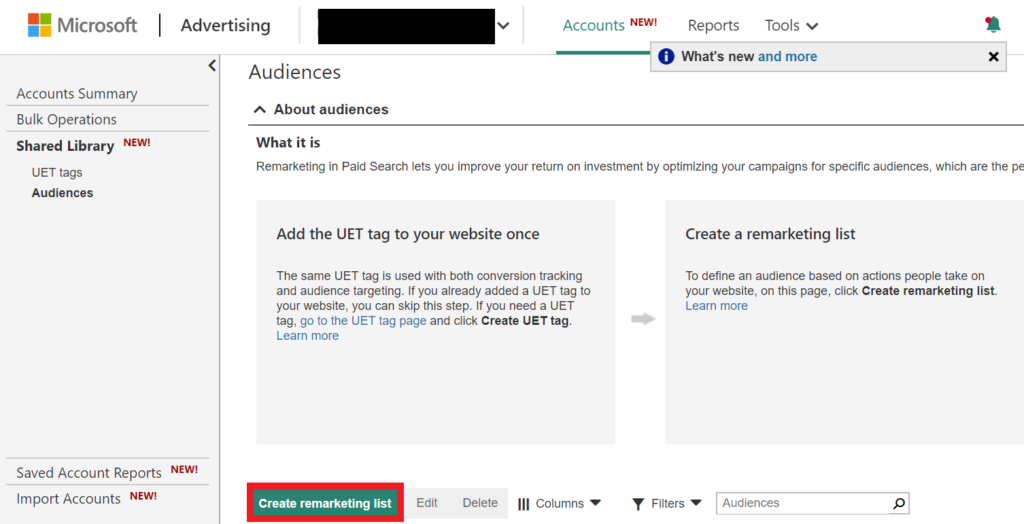
To create a remarketing list, go to “Shared Library” and click on “Audiences.”

Click on “Create remarketing list.”

Fill in the following sections:
- Remarketing list name. Write the name that best describes your remarketing list.
- Who to add to your audience. Pick one of the four rules.

For example, if you set the rule to “URL contains welcome,” your remarketing ad will target unconverted users who visited a page on your site that had “welcome” in the URL.

- Membership duration: Type in how many days you’re willing to wait before you give up on people who didn’t convert. Nick Supapol from SearchEnginePeople recommends using a time lag report to match the membership duration to your sales cycle (e.g., 14 days).
- Tag name. Select the tag name that you verified during the conversion tracking step.

Microsoft Ads: Exclusive features and benefits
While Google Ads and Microsoft Ads share a lot of similarities, there are features unique to Microsoft Ads. Additionally, you get access to Bing traffic, which owns close to 26% of the search market share for desktop searches in the United States (and its traffic is on the rise).
The following are some key features for Microsoft Ads.
Competition Tab
Inside the competition tab, you can peek at some of the key advertising performance metrics of your competitors, such as impression share, average position, and many more.
Additionally, you can view how your competitors perform across devices and over time.
Linkedin profile targeting
With LinkedIn profile targeting, you can target users based on their:
- Industry. Ex. Finance, health care, agriculture.
- Company. Ex. Microsoft, Google, Facebook.
- Job functions. Ex. Operations, real estate, administrative.
For example, say you sell PPC software and you want to reach decision-makers. Linkedin targeting can help you reach a director of digital marketing instead of a PPC analyst.
Importing campaigns from Google Ads
If you import campaigns from Google Ads into your Microsoft account, double-check location targets, as there are differences in supported cities and countries.
In most cases, you’ll be fine if your targeting is based on the state and country level. But things can get tricky when you get down to DMAs and MSAs. Check out a detailed guide on how to import Google Ads here.
How to import Merchant Center from Google
You can also import Google Merchant Center to Microsoft Ads if you have shopping ads set up in Google. First, go to Microsoft Ads and select “Tools.” Next, click on “Microsoft Merchant Center”:

If you haven’t created your store yet, click on “Create store.” If you get stuck on the domain verification stage, follow the steps outlined in the conversion tracking section to copy and paste the UET code onto your website. Next select, “Validated via UET tag” from the destination URL.

The next step is to import a merchant store from Google. You can access the tutorial with the entire process here.
Conclusion
If you’ve primarily relied on Google Ads for your advertising efforts, Microsoft Advertising is a great alternative to add to your mix. With so many marketers and organizations advertising only (or primarily) with Google, there’s plenty of opportunity for those willing to learn a new platform.
With useful features such as Linkedin profile targeting and a variety of ad extensions, Microsoft Advertising has exclusive opportunities, too. Even if you’re setting up your Microsoft Ads from scratch, it should take only a few hours to go from nothing to a live campaign.

That industry level targeting you had mentioned on bing actually is a very smart way to run some B2B campaigns for yourself and have what your doing work a little bit more than they would have otherwise. They now got a upper hand on Google with that addition.