
Sites that don’t work, don’t convert.
Website quality assurance (QA) is the process of checking that a site works as intended before bugs, broken tracking, accessibility problems, performance regressions, or technical SEO issues reach users.
That means more than opening the page in Chrome and checking that it looks right. A proper QA process tests critical journeys, forms, links, content, tracking, performance, accessibility, browsers, devices, integrations, and the technical signals that affect how search engines access the site.
QA matters whenever you launch or change something that affects the customer experience: a new site, landing page, checkout flow, experiment, form, tracking implementation, or campaign.
TL;DR
- Start QA with the highest-value customer journeys: signup, lead generation, checkout, login, or whatever directly affects revenue.
- Test functionality, content, tracking, performance, accessibility, browser/device compatibility, SEO signals, and integrations—not just whether the page looks right.
- Prioritize browsers and devices using your actual audience data instead of trying to test every environment ever released.
- Use both automated and manual QA. Automation catches repeatable regressions; manual testing finds contextual and interaction problems automated checks miss.
- Verify analytics during QA. A working form with a broken conversion event can corrupt your reporting just as easily as a broken form.
- Run QA before launch and repeat it after deployment to catch production-only issues.
Table of contents
- What is website quality assurance (QA)?
- 13-step checklist for website QA
- How do you QA analytics and conversion tracking?
- How should you test a website across browsers and devices?
- How should you test website performance?
- How should you QA website accessibility?
- What SEO checks belong in website QA?
- Which website QA checks should you automate?
- What should your website QA process look like?
- Frequently asked questions about website quality assurance
- How can you improve your website testing and optimization?
What is website quality assurance (QA)?
Website quality assurance is the systematic process of verifying that a website works as intended across the conditions that matter to its users and the business.
That includes checking:
- functionality and critical user journeys;
- visual implementation;
- content and links;
- forms and error states;
- analytics and conversion tracking;
- performance;
- accessibility;
- browsers, devices, and screen sizes;
- technical SEO and indexability;
- integrations, emails, and third-party services.
QA should happen before launch, but it is not a one-time pre-launch task. Sites change continuously through code releases, CMS edits, tracking changes, third-party scripts, experiments, and browser updates.
For an A/B test or experiment, pre-launch QA is mandatory. If one variation contains a technical or tracking problem, you are no longer measuring the effect of the intended change.
QA should happen before launch, but it is not a one-time pre-launch task. Sites change continuously through code releases, CMS edits, tracking changes, third-party scripts, experiments, and browser updates.
If you’ve never run QA on an existing site, it’s still worth starting. Established sites can accumulate broken links, tracking problems, integration failures, and other issues over time.
How is user testing different from website QA?
Website QA checks whether the implementation works as intended. User testing checks whether real people can understand and use it successfully.
There’s some uncertainty about whether quality assurance is just user testing. Often, you’ll see them lumped together, with the terms used interchangeably.
There is a difference, however. Namely, user testing focuses on how the user actually experiences the site; quality assurance focuses on the site itself and how it stacks up against developer intentions.
User testing:
- Examines how real people perceive and use your site/software.
- Explores points of visitor/user misunderstanding, unexpected visitor reactions, points of friction, etc.
- Understands how the visitor experiences the site and how that differs from developer intentions.
Quality assurance:
- Examines the site itself.
- Looks for bugs, glitches, errors, broken links, points of friction, etc.
- Creates a faster, cleaner, better site that works the way the developer intended.
They overlap, but they answer different questions. A checkout can pass every technical QA check and still confuse users. Conversely, a perfectly understandable flow can fail because a button, payment method, or browser-specific interaction is broken.
You might also consider combining qualitative user testing data with quantitative survey data to create a UX baseline. A UX baseline serves two purposes:
- Better understand the effect of your design changes.
- Better understand how your site’s UX compares with your competitors.
According to Ben Labay, Research Director for Speero agency, you should create a UX baseline during the conversion research phase, “ideally in conjunction with user testing so that qualitative insights can be coupled with the quantitative data behind the individual UX dimensions.”
To get quantitative survey data:
- Develop task/study objectives and success criteria.
- Collect data via an unmoderated remote user testing survey.
- Turn the survey results into a score for each dimension of site quality.
With a baseline, you can measure how UX improves (or declines) over time, meaning you can measure the effects of your treatments.
How do UX and QA work together?
UX defines how an experience should help people complete a task; QA verifies that the implemented experience actually behaves that way.
Given that user testing and quality assurance are complementary, it shouldn’t be surprising that the same can be said of user experience and quality assurance.
Jakob Nielsen of the Nielsen Norman Group explains:
Quality assurance (QA) and user experience (UX) have a two-way relationship:
- Most obvious, usability is a quality measure for design. To ensure usability, a good UX thus requires QA thinking.
- Beyond the user interface itself, many other quality issues also impact the total UX. (via NN/g)
QA works best when it starts before development is finished.
If QA understands the intended interaction, accessibility requirements, edge cases, and expected user journey, testers can verify more than whether the page technically renders.
That feedback also works in reverse. Repeated QA failures can expose design assumptions that need to change rather than individual bugs that need to be patched.
UX (and the entire development team) and QA teams should work together from the beginning. This allows QA to better understand the UX team’s intentions, making it easier for them to assess quality and spot bugs.
While most people think of QA helping UX, it really can be a two-way street.
Why is quality assurance important?
Website QA matters because technical failures can block conversions, corrupt measurement, damage trust, and create different experiences depending on the browser or device a customer uses.
Maybe before you push something live, you check it on your desktop, on your phone, in Safari, and in Chrome to make sure everything looks and works right.
At a past CXL Live, Marie Polli, explained how extensive proper quality assurance is—and how risky it can be to ignore:
Sometime yesterday afternoon, your technical team got in touch with you and told you that the test is ready to go live.
You’re at this conference, enjoying yourself, watching the presentations, so you’re happy you can present something to your client. You’re happy you can set it live. You’re actually bringing value to the client.
So you check it maybe from your phone, your laptop, a couple of different browsers, but you don’t really do proper quality assurance. And it’s a very high-risk test. It’s on the checkout page, it directly influences revenue, and it’s an innovative test, so you have multiple elements on the page that were changed that can break.
Marie was talking about innovative testing, which is riskier by nature, but launching something that doesn’t work properly is always risky. And what works on one browser might not work on another, as Ian Newman of Box UK explains:
There is a huge amount of competition in the browser market (and has been since the days of cover disks with either IE, Netscape, or AOL on them) and therefore each browser tries to differentiate themselves.
Due to this, extra features are added or refined on top of the HTML standard meaning that each browser potentially deals with the same HTML in a different way.
You do not need to manually test every browser, browser version, operating system, and device ever released.
Build a risk-based test matrix instead.
Prioritize:
- browsers and device categories your customers actually use;
- environments responsible for meaningful revenue or conversions;
- the latest major versions of Chrome, Safari, Edge, and Firefox where relevant;
- representative iOS and Android devices;
- environments associated with previous bugs or support tickets;
- critical flows where a failure would have a disproportionate business impact.
GA4’s Tech details report includes browser, operating system, device category, device model, and screen-resolution dimensions that can help you determine what your audience actually uses.
Analytics should prioritize your coverage, not define it completely. Low-volume environments can still matter, and new products may not yet have enough historical data.
Poor QA creates two immediate problems:
- It damages trust and credibility.
- It creates frustration.
As Nielsen explains, your site will be tested, no matter what:
Your design will be tested by users—your only choice is whether to run the test yourself before launch so that you can fix the inevitable problems while it’s cheap instead of playing expensive catch-up later.
For best results, quality assurance should be conducted on:
- Landing pages;
- Entire site.
- A/B test treatments;
- Email campaigns (including transactional emails).
13-step checklist for website QA
Here are the main categories that you might find in website QA guidelines:
- Critical flows and functionality: navigation, signup, login, checkout, account actions, search, filters, and other core interactions.
- Forms and error states: validation, required fields, success states, useful error messages, autofill, and failed submissions.
- Copy and content: spelling, formatting, dates, prices, legal text, dynamic content, and placeholder copy.
- Links and navigation: internal links, external links, anchor links, redirects, menus, breadcrumbs, and CTAs.
- Images, fonts, and visual implementation: broken assets, responsive sizing, cropping, layout shifts, font loading, and visual regressions.
- Emails and integrations: transactional emails, CRM handoffs, payment providers, marketing automation, webhooks, and other third-party systems.
- Analytics and tracking: events, key events, ecommerce data, parameters, attribution, consent behavior, and duplicate firing.
- Performance: loading speed, responsiveness, visual stability, asset weight, and Core Web Vitals.
- Accessibility: keyboard access, focus, labels, contrast, alternative text, zoom/reflow, screen readers, and error handling.
- Browser and device compatibility: representative desktop/mobile browsers, operating systems, screen sizes, orientation, and touch interaction.
- SEO and indexability: status codes, redirects, canonicals, robots directives, sitemaps, metadata, structured data, and accidental staging directives.
- Security and privacy: HTTPS, mixed content, exposed information, permissions, consent behavior, and obvious security warnings.
- Errors and failure states: 404s, 500s, offline/slow-network behavior, unavailable integrations, failed payments, and other edge cases.
Turn this into a repeatable checklist for your own site. Generic QA catches common problems; your internal checklist should also include the components, integrations, browsers, and failure modes specific to your product.
Where should you start website QA?
Start with the journeys where a failure has the largest impact on customers or revenue.
If you haven’t conducted quality assurance before, this is the perfect place to start. It just makes sense to start by conducting quality assurance on the user experiences that are the most profitable, right?
If you don’t go through your funnels step-by-step to ensure quality, you are neglecting to plug the biggest, most expensive leaks.
Or, you could waste thousands of dollars sending paid traffic to a landing page only to find out that people aren’t converting because of a problem on the checkout page.
To make sure the elements of your funnel are technically sound and issue-free, you could try writing scenario-based use cases, tasks for yourself. For example, “Submit lead gen form for ebook 1,” or, “Make a purchase by searching Google for keyword X.” Think of it as user testing, but you’re the user.
Walk through each critical journey from beginning to end:
- successfully complete the task;
- deliberately enter invalid information;
- abandon and return where relevant;
- test logged-in and logged-out states;
- test payment or third-party handoffs;
- confirm the success page or state;
- confirm expected transactional emails or CRM actions;
- confirm the corresponding analytics events fired correctly.
A lead form that submits but never reaches your CRM is broken. A checkout that accepts payment but fails to record the purchase event is also broken.
As Catriona Shedd of SalesforceIQ notes, you should also create scenarios where you fail to perform the task:
Create several scenarios in which a user fails, whether it be because of system constraints, incorrect actions, or unexpected system failure.
Try to ensure that errors are prevented whenever possible and that errors that do occur are clearly explained and help move the user forward.
How do you QA analytics and conversion tracking?
Complete the same journeys you test functionally while verifying that the expected analytics events and parameters are recorded once, with the correct values.
For GA4, use DebugView while testing your own session. It displays events and user properties as they are collected, making it useful for debugging implementations before relying on standard reports. Google also recommends the Realtime report for confirming that events and key events are being received.
Check:
- page and screen views;
- form submissions;
- lead or signup events;
- purchases and transaction values;
- important CTA interactions;
- event parameters;
- duplicate events;
- cross-domain journeys;
- UTM/campaign information where relevant;
- consent behavior;
- whether key events are actually marked and recorded correctly.
Do not assume tracking works because the tag exists. Trigger the event yourself and verify what arrives.
How should you test a website across browsers and devices?
Use audience data to choose a representative browser/device matrix, then combine manual exploratory testing with automated regression checks.
Next, let’s focus on making sure your site (or treatment, email, etc.) displays properly on all browsers and devices. Note that you conduct cross-testing for two reasons:
- To discover bugs and errors. (You’re trying to break something.)
- To verify the user experience. (You’re making sure the experience is as developers intended.)
Google Analytics can help you find problem areas by looking at how your current visitors browse your site.
In GA4, go to:
Reports > Tech > Tech details
The report can be viewed by dimensions including:
- Browser;
- OS with version;
- Device category;
- Device model;
- Platform/device category;
- Screen resolution.
If the report is not visible in your left navigation, an Editor or Administrator can add it.
Use this data to build your test matrix, but interpret performance differences carefully. A lower conversion rate on one device does not prove a compatibility bug. Audience mix, traffic source, geography, and intent can also differ.
Treat unusual performance as a signal to investigate, then reproduce the journey in that environment.
Now, if you’re conducting quality assurance pre-launch, the typical advice is to start with the most popular browsers and devices, then work your way down to less-popular ones. However, this isn’t your only option.
Chris Ashton of BBC explains how he and his team do cross-testing to save their sanity…
1. Reconnaissance
Conduct exploratory tests in a popular browser on a development machine. Get a feel for where the bugs might be hiding. Fix any bugs encountered.
2. Raid
Manually testing on a small handful of problematic browsers likely to demonstrate the most bugs. Fix any bugs encountered.3. Clearance
Sanity checking that the most popular browsers amongst your audience are cleared to get the expected experience.
Here’s how that looks visually:
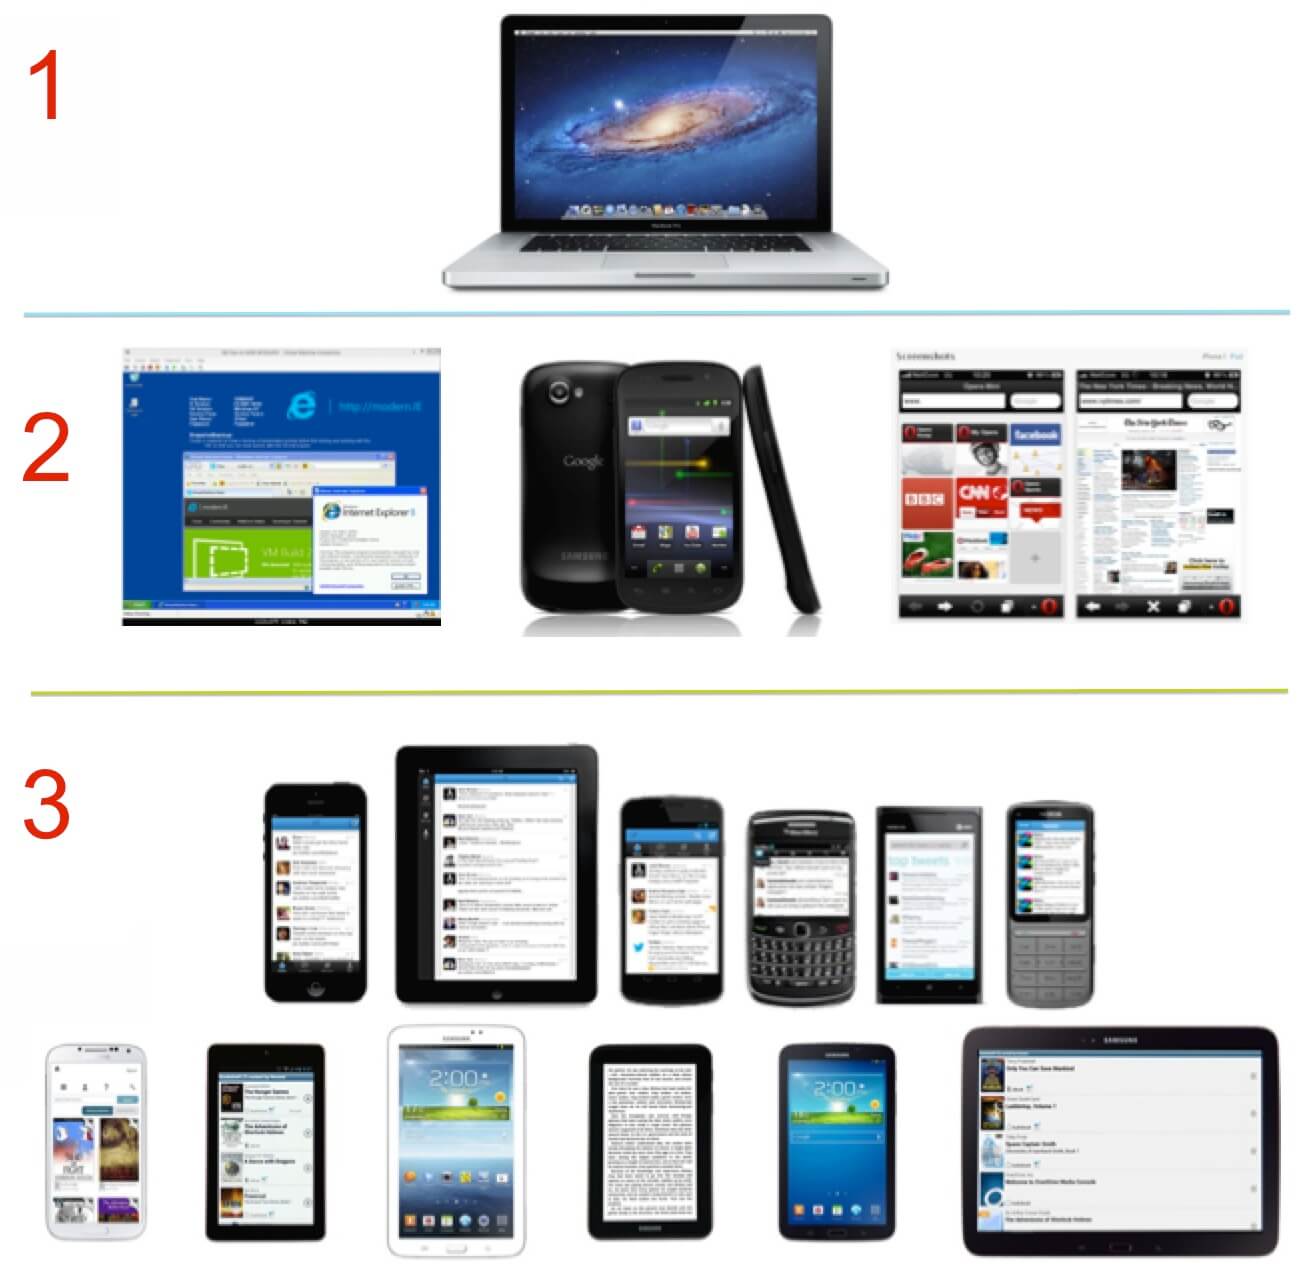
In step one, you focus on the browser-agnostic issues. In step two, you find many, many more issues by checking your most problematic browsers, which also makes your site more resilient in less-problematic browsers.
Once you’re confident in the first two steps, you can move on to other browsers, knowing you’ve likely already fixed most issues.
Cloud testing platforms such as BrowserStack let you test environments you do not physically own.
BrowserStack Live currently supports manual testing on real iOS and Android devices, Windows and macOS browsers, internal or staging environments, multiple devices at once, network conditions, debugging tools, and screen readers.
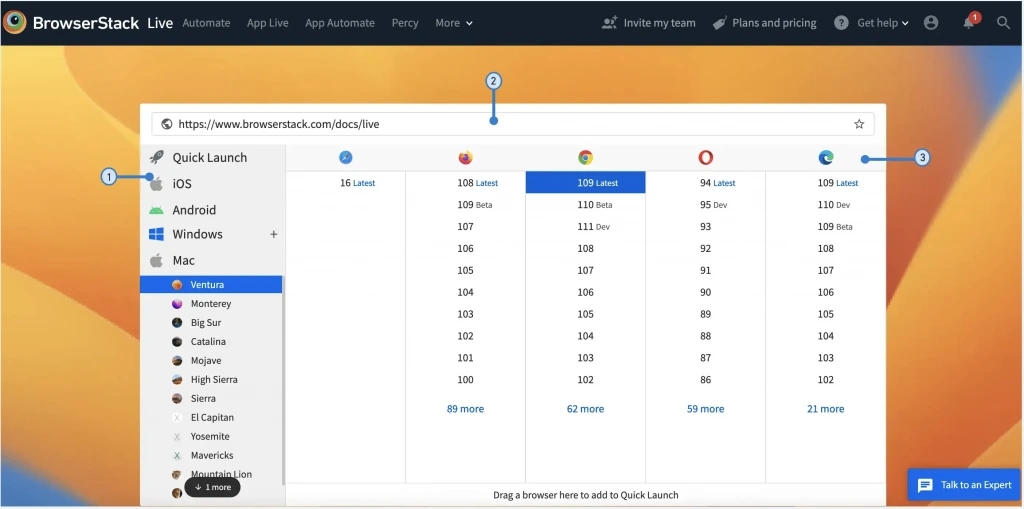
Depending on your QA process, you can combine:
- Manual live testing for exploratory interaction and debugging.
- Multi-device testing to compare the same journey on several environments simultaneously.
- Local/staging testing before a site is publicly accessible.
- Automated browser testing using frameworks such as Playwright, Selenium, or Cypress.
- Visual regression testing to detect unintended layout changes.
Real-device testing remains useful because emulation cannot reproduce every difference in browser engines, hardware, operating systems, touch behavior, and device-specific interactions.
What should you test specifically on mobile?
Mobile QA should test the interaction itself—not just whether the desktop layout collapses neatly onto a smaller screen.
As we’ve written before, just because you have a responsive design doesn’t mean your site displays and works properly on all browsers and devices. You still need to conduct quality assurance.
Due to the nature of mobile, you also need to consider some mobile-specific factors. Remember, a quality desktop experience looks quite different from a quality mobile experience.
Check:
- Responsive layout: text, cards, tables, images, modals, sticky elements, and navigation at different viewport sizes.
- Orientation: portrait and landscape where relevant.
- Touch interaction: buttons, links, sliders, menus, drag interactions, and controls that were designed around hover.
- Forms and keyboards: correct input types, autofill, password managers, validation, and whether the on-screen keyboard obscures fields or CTAs.
- Error states: make errors visible, specific, and connected to the field that needs attention.
- Zoom and text scaling: content should remain usable when users enlarge it.
- Media: video, audio, embeds, downloads, camera/file uploads, and fullscreen behavior.
- Network conditions: test important journeys on slower or unreliable connections, not only office Wi-Fi.
- Fixed UI: cookie banners, chat widgets, sticky CTAs, and navigation should not cover critical content.
- Accessibility: keyboard-equivalent interactions, focus, screen-reader output, and sufficiently usable touch targets.
Responsive CSS alone does not guarantee a usable mobile experience.
Of course, the list goes on and on. When you switch to mobile quality assurance, switch your mindset and adjust your definition of quality, too.
How should you test website performance?
Use both real-user performance data and controlled lab testing, because they answer different questions.
The current Core Web Vitals are:
- Largest Contentful Paint (LCP): loading performance. A good result is 2.5 seconds or less.
- Interaction to Next Paint (INP): responsiveness. A good result is 200 ms or less.
- Cumulative Layout Shift (CLS): visual stability. A good result is 0.1 or less.
Google evaluates those targets at the 75th percentile, separately for mobile and desktop.
Use field data where available because it represents real users. Use tools such as Chrome DevTools, PageSpeed Insights, or Lighthouse to reproduce and diagnose problems in a controlled environment.
Lab and field results are not interchangeable. For example, INP requires real interactions and cannot be measured directly by a traditional page-load-only lab test; Lighthouse uses Total Blocking Time as a lab proxy for responsiveness.
QA performance after meaningful releases, particularly when changing:
- JavaScript;
- analytics or advertising tags;
- images or video;
- fonts;
- consent platforms;
- personalization;
- third-party embeds;
- page templates.
How should you QA website accessibility?
Combine automated accessibility checks with manual testing. Automated tools can identify many technical problems, but they cannot determine whether a site is fully accessible.
WCAG 2.2 is the current W3C Recommendation and extends the earlier WCAG standards with additional criteria covering areas such as focus visibility, dragging interactions, target size, and accessible authentication.
At minimum, manually check:
- complete keyboard navigation;
- visible and logical focus order;
- form labels and instructions;
- useful validation and error messages;
- image alternative text;
- headings and document structure;
- color contrast;
- zoom and text resizing;
- reflow at narrow widths;
- links and buttons with understandable accessible names;
- dialogs and menus;
- screen-reader output for critical journeys.
Automated tools are useful for repeatable checks, but W3C explicitly notes that no tool alone can determine whether a site meets accessibility requirements; knowledgeable human evaluation is still required.
What SEO checks belong in website QA?
Before launch, verify that search engines can access and index the pages you want indexed—and cannot accidentally index environments or URLs that should remain private.
Check:
- HTTP status codes;
- redirect destinations and chains;
- canonical URLs;
noindexdirectives;- robots.txt rules;
- XML sitemap URLs;
- title tags and meta descriptions;
- hreflang where applicable;
- structured data;
- internal links;
- accidental staging URLs or production pages still carrying staging directives.
One common mistake is treating robots.txt as an index-control mechanism. Blocking a URL in robots.txt does not guarantee that it stays out of search results. Use noindex when index exclusion is the goal, but make sure crawlers can access the page so they can see the directive. For staging or genuinely private environments, use authentication or password protection rather than relying on robots.txt.
Also check experiments that use separate URLs. Google recommends canonicalizing alternate experiment URLs to the original page and using 302 temporary redirects rather than 301s for redirect-based experiments.
Which website QA checks should you automate?
Automate repeatable checks that should behave the same after every release, but keep manual exploratory testing for problems that require context or human judgment.
Good automation candidates include:
- critical signup, login, checkout, and lead-generation flows;
- broken links;
- visual regression;
- expected status codes;
- accessibility rules that can be tested programmatically;
- performance budgets;
- analytics-event validation;
- recurring browser/device regression tests.
Modern browser automation can run the same journey repeatedly using tools such as Playwright, Cypress, or Selenium, while Lighthouse can also run in CI to catch performance regressions before deployment.
Do not treat automation as a replacement for manual QA. W3C makes the same point for accessibility testing: automated tools can detect issues, but some checks require human judgment.
What should your website QA process look like?
Prioritize high-risk customer journeys, test them systematically before launch, automate repeatable regression checks, and verify the production release after deployment.
Website QA is not a final visual check before someone clicks Publish.
A site can look perfect while its checkout fails in Safari, its form events fire twice, its mobile menu traps keyboard focus, its Core Web Vitals regress, or a production page accidentally retains a noindex directive.
Build QA into the release process:
- Define what should happen.
- Identify the journeys and environments where failure matters most.
- Test successful and failed states.
- Verify analytics and integrations.
- Check performance and accessibility.
- Verify browser and device coverage.
- Check technical SEO and indexability.
- Automate repeatable regression tests.
- Run a final production smoke test after deployment.
The objective is not to prove that a site contains zero bugs. It is to find the failures most likely to affect users, revenue, measurement, or discoverability before your customers find them for you.
Frequently asked questions about website quality assurance
What is website QA?
Website QA is the process of verifying that a site functions, displays, measures, and behaves as intended before and after changes are released.
What should you test before launching a website?
Test critical journeys, forms, links, content, analytics, integrations, performance, accessibility, browsers and devices, SEO signals, and failure states.
Is website QA the same as user testing?
No. QA checks whether the implementation works as intended; user testing checks whether people can understand and use it successfully.
How do you choose which browsers and devices to test?
Use audience data, business impact, recent browser and OS versions, previous bugs, and the importance of the journey to create a risk-based test matrix.
Can website QA be automated?
Yes. Functional flows, browser regression tests, accessibility checks, visual changes, links, and performance can all be partly automated, but manual QA is still necessary.
How often should website QA be performed?
Run QA before significant releases and repeat relevant regression checks after deployments, tracking changes, CMS updates, experiments, and major third-party changes.
Does website QA include accessibility?
Yes. Accessibility should be tested throughout design and development using both automated checks and manual evaluation.
Does website QA include SEO?
Yes. Technical QA should verify indexability, status codes, redirects, canonicals, robots directives, sitemaps, structured data, and other search-critical implementation details.
How can you improve your website testing and optimization?
Website QA prevents technical problems from contaminating the customer experience and the data you use to improve it. The next step is connecting that process with research, experimentation, and ongoing optimization.
Build a stronger experimentation process: CXL’s CRO and Experimentation course covers identifying conversion problems, prioritizing opportunities, and building a structured testing process.
Understand the experience behind the bugs: The User Research course covers identifying friction, validating experiences, and combining qualitative and quantitative evidence.
Protect organic performance when changing your site: The On-Page, On-Site & Programmatic SEO course covers site architecture, crawlability, internal linking, and scalable on-site optimization.
Related Posts
-

In today's review, Tommy is assessing the visual complexity of a cabinet hardware eCommerce site…
-

Do you want to make your website better? There are many ways to optimize a…
-

In today's review I'm assessing whether websites in question could do anything to better get…
-

List building is a top priority for a blog. In this review we look at…





That’s Great Article website quality is first thing thanks for the great review and help.
Thanks Jadi. I really appreciate it. Glad I could help.