


Google Analytics and Google Tag Manager have limitations. Often, these limitations are outside your control (e.g., technical aspects of a website that can’t be changed).
Fortunately, many issues—such as updating a user status from your CRM or sending refund data—are solved by using Google Analytics’ Measurement Protocol:
The Google Analytics Measurement Protocol allows developers to make HTTP requests to send raw user interaction data directly to Google Analytics servers. This allows developers to measure how users interact with their business from almost any environment.
Don’t let the “allows developers” phrase scare you. Using the Measurement Protocol is nothing more than adding a bunch of parameters to a URL. Therefore, it should be equally simple for people who aren’t developers to add it to their toolstack.
This article shows how marketers can use the Measurement Protocol without coding—structuring data in Google Sheets or Excel instead. Still, there are advantages from being able to code (even a little bit), or having a developer friend to help with some of the solutions below.
Table of contents
Parameters and why they matter
With the Measurement Protocol, you can mirror the data and collection method of Google Analytics. On any page running Google Analytics, simply go to the console under Network and type “collect.”
Reload the page, and this will show up:
https://www.google-analytics.com/collect?v=1&_v=j79&a=27896466&t=pageview&_s=1&dl=https%3A%2F%2Fcxl.com%2F&ul=en-gb&de=UTF-8&dt=Optimization%20and%20Growth%20by%20CXL&sd=24-bit&sr=1440x900&vp=885x789&je=0&_u=SCCAgAALQ~&jid=&gjid=&cid=583336462.1570739164&tid=UA-486673-28&_gid=521630025.1570739164>m=2wg9p0NX56DK&cd4=%22%22&cd5=583336462.1570739164.1570739177647.pageview&z=1459566673

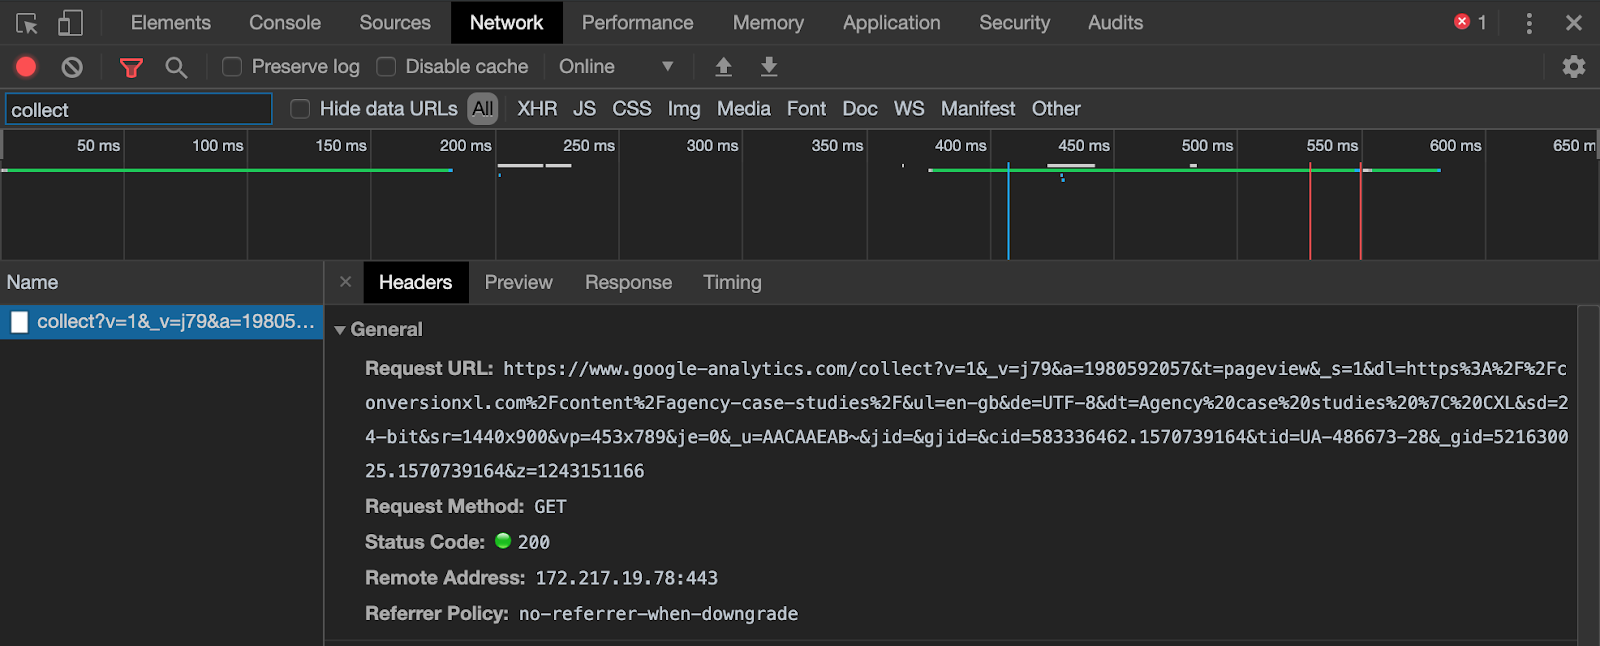
At a glance, this might seem incomprehensible; however, if you deconstruct the URL from the query parameters, you’ll see it as a list of information that’s passed to Google Analytics:
- v: 1
- _v: j79
- a: 27896466
- t: pageview
- _s: 1
- dl: https://cxl.com/
- ul: en-gb
- de: UTF-8
- dt: Optimization and Growth by CXL
- sd: 24-bit
- sr: 1440x900
- vp: 885x789
- je: 0
- _u: SCCAgAALQ~
- jid:
- gjid:
- cid: 583336462.1570739164
- tid: UA-486673-28
- _gid: 521630025.1570739164
- gtm: 2wg9p0NX56DK
- cd4: ""
- cd5: 583336462.1570739164.1570739177647.pageview
Here it can be seen that:
- Document location (DL) is https://cxl.com.
- User Language (UL) is English.
- Document Encoding (DE) is UTF-8.
- Client ID (CID) is 583336462.1570739164.
- Tracking ID (TID) is UA-486673-28.
- We are tracking (T) a pageview.
- And so on.
The URL contains the exact information sent to Google Analytics. You use the same approach to send data through the Measurement Protocol—emulating what happens each time you do something on a webpage that’s tracking user behavior.
To see all available parameters, visit the Measurement Protocol Parameter Reference guide.
Sending data via the Measurement Protocol
Most programming languages are capable of sending data via the Measurement Protocol through Post messages.
I recommend using the tool that’s most natural for you to use. If you like using R, Mark Edmonson created a package that lets you do it. To execute requests, the only thing you need is the data.
But you can also do it via Python, PHP, and tools such as Zapier or Google Sheets.
Note: Before executing any instructions for the use cases below, please read the caveats and advice section that follows.
4 practical examples for using the Measurement Protocol
For marketers, four use cases highlight the potential value of the Measurement Protocol:
- Correct missing transactions;
- Adjust duplicate purchases;
- Send refund data;
- Update a lead status.
1. Correct missing transactions
With Google Analytics, proper quality assurance can be difficult. You may not realize that ecommerce tracking isn’t working—until you discover that data is missing.
To add missing transactions to your Google Analytics Property, you need the following data points:
- Google Analytics data with order ID’s and date;
- Actual sales data for the time period that needs to be recovered.
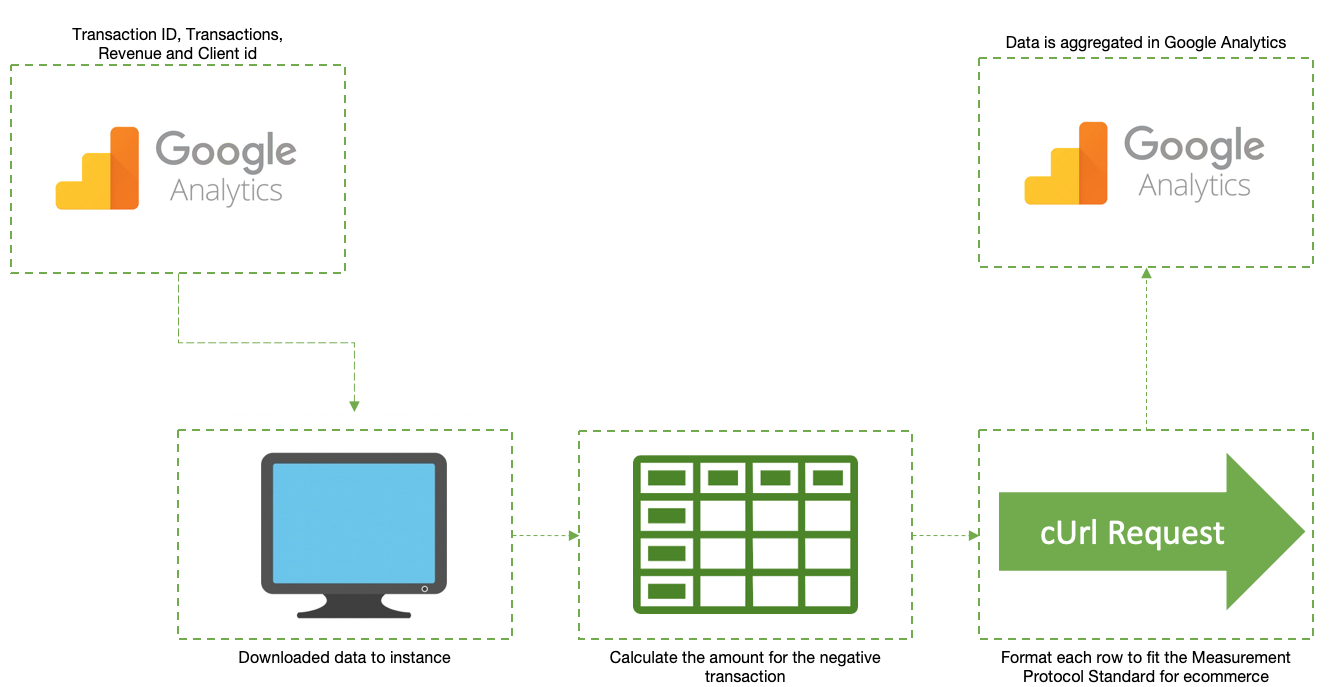
This is the flow that makes it possible to extract, transform, and load data back into Google Analytics:


Here are the steps to do it:
Extract the data
To begin with, we need the correct data from a sales database. Once we have the correct transactions for the missing period, extract the sales data from Google Analytics through the API, or export the data into Google Sheets:


Transform the data
Once you have the data, create a sheet (Excel or Google Sheets—doesn’t matter) and merge the transaction IDs and revenue. The table should look like this:


You can then use this formula to see if there are any duplicate values in the dataset:
=IF(COUNTIF(A:A,A2)=1,0,1)


Filter out any transaction that already exists in Google Analytics (i.e. select rows only with the value “0” in them).
To finish creating the upload dataset, add the necessary parameters. Use the Google Sheet template here to align your dataset with the image below:

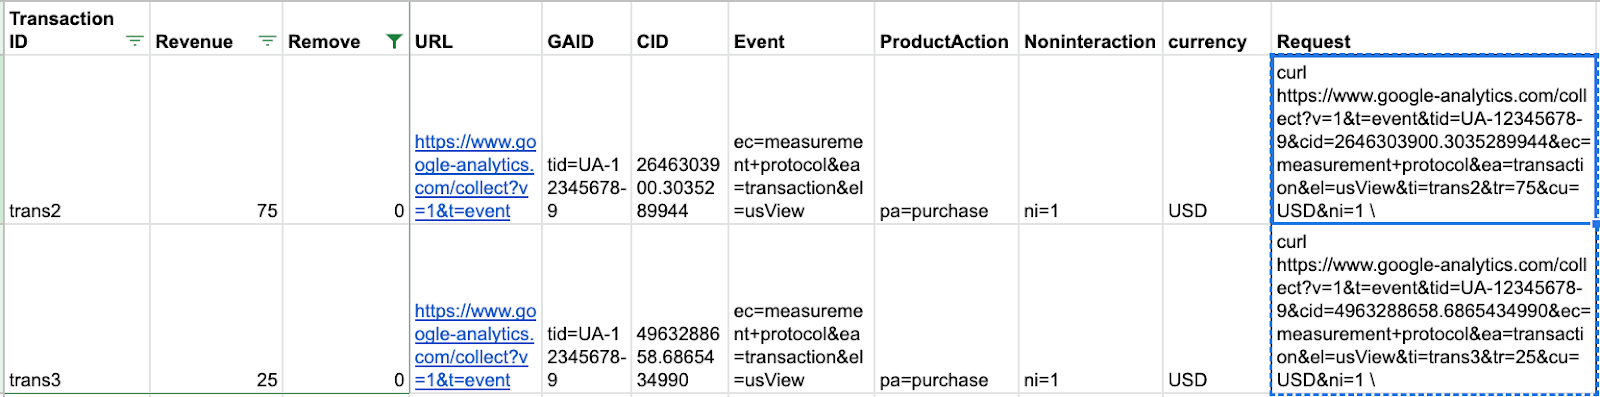
The last step to transform the data is to copy the information from the “Request” column into your favorite code editor, such as Visual Studio Code:


Load the data into Google Analytics
You need to send cUrl requests with the hits created in the previous step. To do so, open your terminal or GIT Bash. Copy all the code and press Enter.
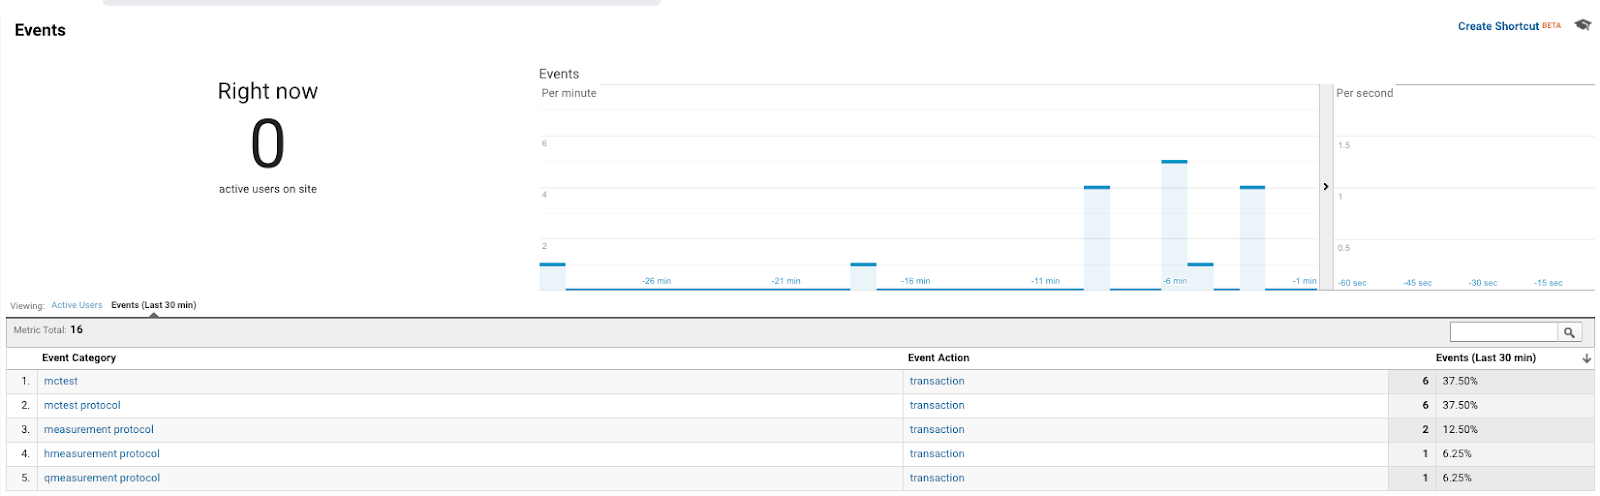
The following view should now appear:


Press Enter one last time to get the last row, and look at the Real-Time report (“Last 30 min”) to confirm that the hits have been sent:

Unfortunately, Google’s data model doesn’t allow you to specify a date for the uploaded data; it’s determined based on the time the data is sent. Another side effect of this approach is that you lose the users’ Client ID and, therefore, the referral data for the transaction.
A way to manage this is to give a weighted distribution on your calls “traffic source” and “medium” based on historical data. You can also give out custom values, such as calling the traffic source “Measurement Protocol.”
The most important thing is that it fits your business. And, of course, the optimal solution is to QA your Google Analytics setup after any site releases that might affect tracking.
2. Adjust duplicate purchases
A frequent issue in Google Analytics is duplicate transactions. Duplicate transactions can happen if people revisit the receipt page, or if something is wrong with the technical implementation.
When auditing Google Analytics, you sometimes find that a site isn’t tracking Enhanced Ecommerce with Events. This causes ecommerce data to be sent with a Pageview, and—if an Event occurs on the transaction page at the same time—it will generate two transactions.
Correcting this data can fix revenue figures for weekly or monthly reporting. However, because we need to add a negative transaction to correct the purchase amount, it creates an additional transaction, inflating the total number of transactions on the site and skewing the ecommerce transaction rate.
Thus, I recommended this approach only:
- To correct large revenue discrepancies;
- If you use Google Analytics to report revenue.
The approach is similar to the one for the previous use case of adding missing transactions. This time however, only Google Analytics data is needed (not sales data). You’ll use the following variables:
- Transaction ID;
- Transactions;
- Revenue;
- Client ID (not mandatory but will improve accuracy).
The flow to create negative transactions looks like this:

Extract the data
As in the previous step, download the data from the API or create a Custom Report with the necessary Metrics and Dimensions, then export it to Google Sheets.
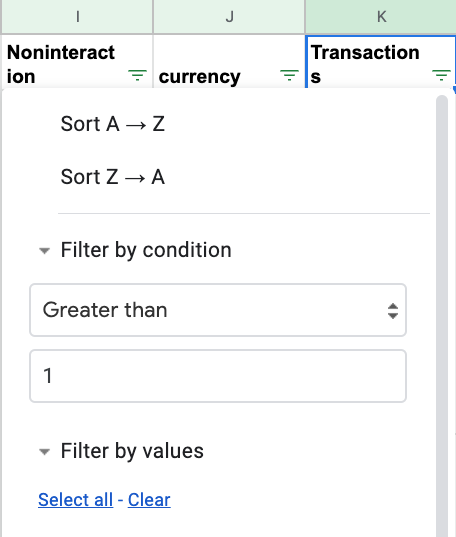
Transform the data
Not all transactions are likely to be duplicates. Create a filter and only include transactions greater than “1”:

Then, calculate the refund amount using this formula:
(Revenue - (Revenue/Transactions))*-1
This should result in a view similar to this one:


Finally, make the cells match this Google Sheet and follow the same approach as before, copying the data into a code editor.


Load the data into Google Analytics
As before, go to your terminal and paste in the lines from the spreadsheet. Check that data is coming in correctly to your View.
3. Send refund data
Sending refund data to Google Analytics is not the same as reversing a transaction.
Instead, refund data appears separately in your Enhanced Ecommerce reports to help analyze how many transactions and products are refunded and, in turn, whether something is wrong (e.g., the way products are displayed on the site).
Getting refund data into Google Analytics automatically takes resources; many ecommerce companies skip the process altogether. This makes it difficult to calculate Return on Marketing Investment (ROMI) when comparing Google Analytics data to actual sales numbers.
If possible, the Client ID is great to have—it’s the most precise way to connect the refund to the user. If it’s not available, simply generate a unique one.
The process for creating refunds is the following:


Extract the data
Refunds added to Google Analytics will occur on the date they are sent. To get the most precise refund date, send them in often to get as close to the actual refund date as possible.
Transform the data
The Measurement Protocol hit for refunds is almost identical to the one for sending in purchase data. The only difference is the value for the parameter “pa” (Product Action), which is named “refund.”
To create the dataset, use this template and replace it with the refund data that you’ll copy and send through cURL requests:


Load the data into Google Analytics
As in the other examples, copy the “Request” column, open the terminal, and paste the values:


Finally, check the Google Analytics Real-Time report to ensure that data is coming in correctly. The data should be available under Ecommerce > Sales performance.
4. Update a user status from your CRM
Ecommerce data can indicate how an online store is performing. If a business’ primary KPI isn’t selling products but converting leads, however, it can be difficult to assess the efficiency of marketing efforts.
Lead scoring—one way to assess those efforts—isn’t always feasible via standard Google Analytics data collection. Here, it’s up to developers to update the status of users and send that data back into Google Analytics.
That data offers marketers some new analytical options:
- Understand the time lag from when a user first visits the site to when they become a sales-qualified lead.
- In terms of attribution, see the marketing efforts that most efficiently converted leads.
- For leads that get declined or exit the lead-scoring funnel, the data can help segment against them, preventing wasted marketing spend.
Here’s a hypothetical flow for bank leads:


The next steps show how to acquire the Client ID and use it to update the user status via the Measurement Protocol.
Collect the Client ID
To connect on-site user behavior to Google Analytics, the Client ID must first be collected:


A hidden field should collect the Client ID from the ga cookie. This value needs to be stored in the CRM/lead-scoring system.
Create a Measurement Protocol trigger
Once the data is collected, developers need to set up the system to fire a hit each time a user status updates. The hit needs to be formatted this way:
https://www.google-analytics.com/collect?v=1&t=event&tid=UA-12345-6&cid={{the client id from the CRM}}&ec=measurement+protocol&ea=lead+updated&el={{the lead status updated}}&cd1={{the lead status updated}}&ni=1
The “cd1” parameter is the Custom Dimension. If you need to set it to another Custom Dimension (because you’ve already created others), you can use any number between 1 and 20 (200 if you have Google Analytics 360) after the “cd” variable, such as cd17 for Custom Dimension 17.
3. Set up the Custom Dimension
To receive the data from the Measurement Protocol hit, you need to activate the Custom Dimension. As we’re updating the users’ lead status, the scope should be set to “User” level:


Click “Create.” The following information should appear with the Custom Dimension number:


From here, the data should be available as a Custom Dimension in reports when selecting Secondary Dimensions:


Caveats and advice
This section illustrates areas for which I wish there were more guidance in online communities, or even in the Google Developer documentation. These are things I’ve learned through trial and error.
Read this section thoroughly before implementing any solutions, as these caveats could potentially break your tracking setup if you’re not careful.
Set up filters for View-specific data
When working with multiple countries or business units, your tracking setup might look like this:

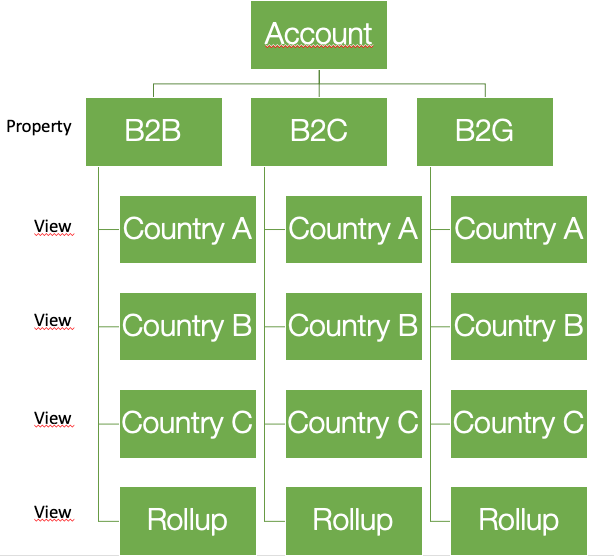
However, sending a Measurement Protocol hit to your site will add the data to all Views in a Property. This means that if you try to send in transactions for Country A, this data will also be sent to Countries B and C.
In many cases, you need to split up the information to populate specific Views. To do this, add an Event to your hit to filter the data.
For example, send an Event to your Google Analytics Property with the following information:
- Category: Measurement Protocol;
- Action: [the action the hit produces];
- Label: [which Views it should send to].
If we use the country example mentioned above, a filter that takes data only to Country C and the roll-up View could look like this:


It’s a simple way to exclude unwanted data and to use segments to view data delivered via Measurement Protocol hits.
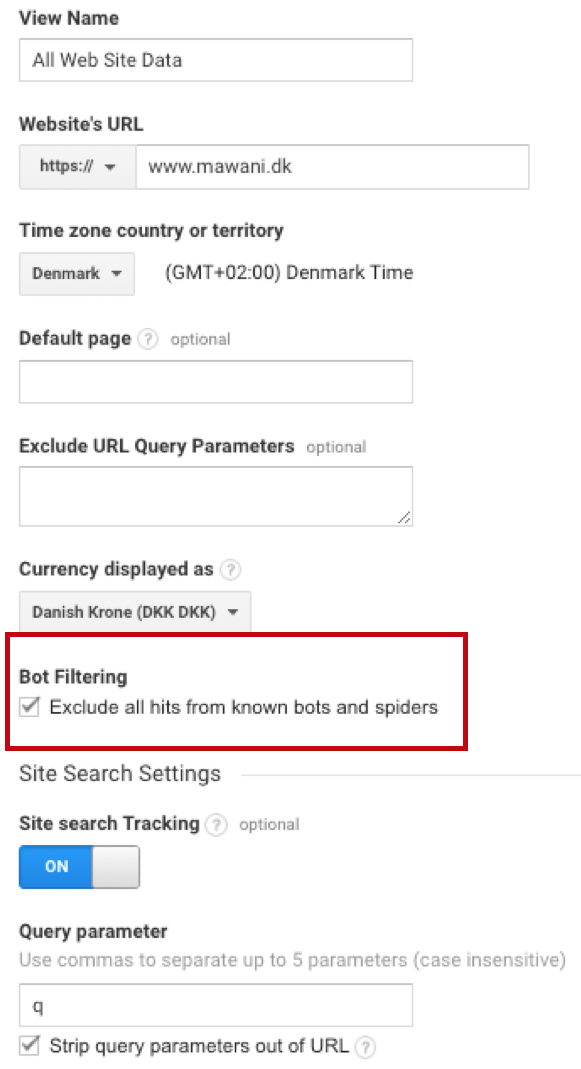
Uncheck Bot Filtering
An easy mistake is forgetting to uncheck Bot Filtering when sending hits. Bot Filtering will, in most cases, block Measurement Protocol hits from being sent to the Property.
Go to View Settings and make sure the checkmark box is empty. If it’s checked (as in the example below), uncheck it.

Formatting currencies
Always specify the currency for the value being sent. When getting data from your CRM or other platforms, convert the currency to a single unit, or make sure that each row of your data specifies the right currency.
To see how currencies should be formatted, visit Google’s help center.
Be careful with the Client ID
When sending data to Google Analytics, it’s best to have a unique Client ID. If you use the same one every time, all the data will be attributed to one user, which will skew your data. Instead, I recommend one of two solutions:
- Send the original Client ID for the data that you’re trying to upload. This is the most accurate way.
- Generate a Unique Client ID for each hit to distribute data evenly across unique users.
Keep GDPR in mind and protect users
The last thing worth mentioning about Measurement Protocol is to respect users. Once you have a Client ID and an email, the marketing possibilities are endless.
You can understand exactly who does what on your website, run segmented retargeting campaigns—even for people who don’t want it—etc.
Always have documented permission and be compliant with Measurement Protocol guidelines.
Conclusion
This post has focused on how to use the Measurement Protocol with as little coding knowledge as possible. But there are many (more) ways to work with it.
Build a workflow that aligns with the technical strengths of the user sending the requests. (To see an example of how Measurement Protocol can be automated with the statistical programming language R, check out this blog post.)
Measurement Protocol can be an asset to improve data collection. However, it can also cause more harm than good to your Google Analytics Property if used incorrectly. Send the information to a test account before putting it into production.
Finally—and unfortunately—others can also use the Measurement Protocol for your site, making it easy for third parties to obscure your data with misleading information. When you’re not sending Measurement Protocol data, filter out bot traffic in View settings and your filters.
Related Posts
-

Over the last years, Google Data Studio has evolved from an appealing but clunky application…
-

After reading some subscriber feedback, we noticed that many CXL readers didn't have a solid…
-
A/B testing tools like Optimizely or VWO make testing easy, and that's about it. They're…
-

This post is not a dry feature-by-feature comparison, nor does it include a winner-take-all verdict.…
