


More and more business owners are learning about the benefits of the new version of Google Analytics (referred to as “Universal Analytics”) as well as the utility of Tag Management Systems (made even more popular by the release of the free Google Tag Manager).
Peep reached out to me to write an article about moving an inline GA implementation to Google Tag Manager.
This is work we do often over at Analytics Ninja, so I feel more than happy to provide this guide for CXL’s readers. There are many benefits of using a Tag Management System, though as my friend Julien Coquet puts it, “it’s not a miracle cure.”
If you take a quick look at any TMS vendor’s benefits page, you’ll notice the following big points stick out (here are Google’s):
- IT-Friendly
- Easy Testing
- Good for Agencies
- Mobile Integration
- Works with many tags
- Rule driven business logic
In my experience, the biggest benefits of a Tag Management System is that one’s tagging becomes less IT reliant (don’t shut them out though, IT should be involved), tagging becomes more consistent and accurate, and relatively complex tagging tasks can be done via a rule driven, graphical interface. I’ll provide a few examples. Throughout web development cycles, code and HTML markup on the page is bound to change. While a Tag Management System does not make an implementation immune to these changes, the use of a single JavaScript snippet makes it less likely for an on page change to wipe out particular tracking. In other words, if the majority of your tagging is directly within the HTML markup of the page, it is more at risk for developers to clobber it. We’ve seen this again and again during the Google Analytics audits that we perform, and use of a Tag Management System certainly decreases this occurrence. Sometimes, organizations have significant logistical challenges as it relates to updating code on their site(s) in a time efficient manner. For example, one of my clients is a global retailer with dev teams working on different sites in Europe, Australia, South America, Japan, and the United States. While in the process of migrating their deployment of Google Analytics into Google Tag Manager, I realized that they weren’t passing back the currency code in their e-commerce tag. Instead of creating separate tickets for each of the relevant developer groups in the company’s project management system, and then waiting for the tagging request to be prioritized and approved, in less than 15 minutes I was able to make the necessary change and deploy a fixed configuration across multiple websites spanning the globe. A Tag Management System can add tremendous efficiency to an organization’s deployment capabilities; do you really need the addition of an Ads remarketing pixel to take a couple of weeks?
Table of contents
Tags, Rules & Macros in Google Tag Manager
Before we get started with the migration guide, let’s define a few terms.
- Tags – Tags are simply snippets of code that are deployed by the Tag Management System.
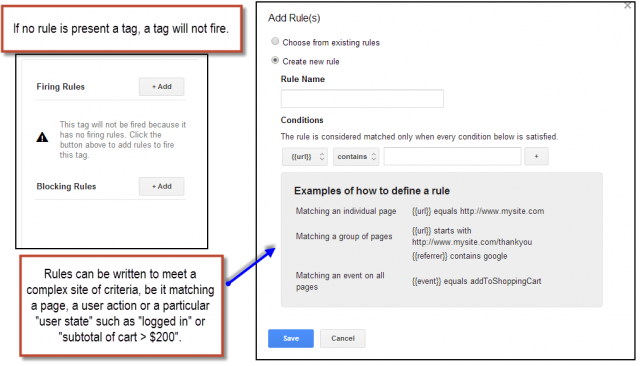
- Rules – Rules determine whether or not a tag fires (i.e. the code executes on the page).
- Macros – these are values that can be used to set conditions within rules. Macros are denoted in Google Tag Manager by being placed in double brackets. {{macro}}
We’ll return to some more common use cases of rules and macros later in this post.
Understanding Google Analytics’ Tracking Code & How To Move To Google Tag Manager
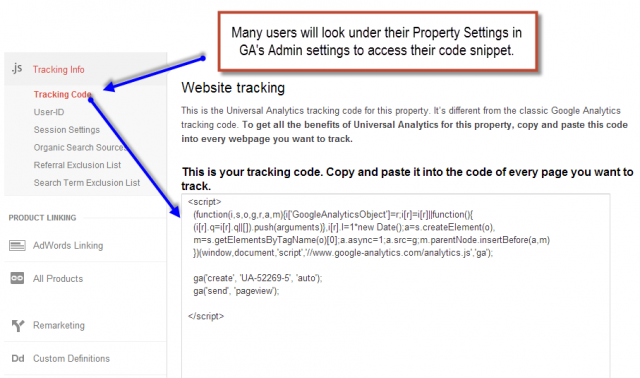
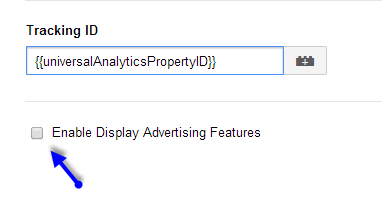
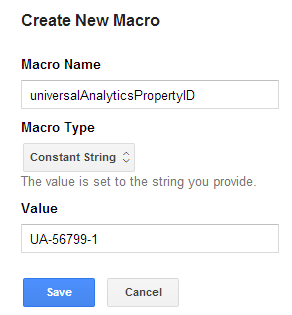
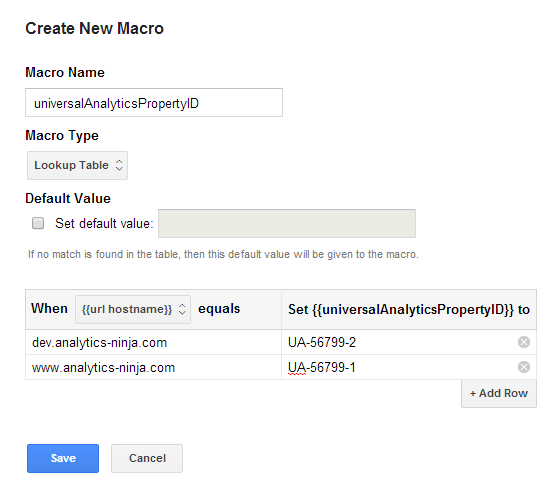
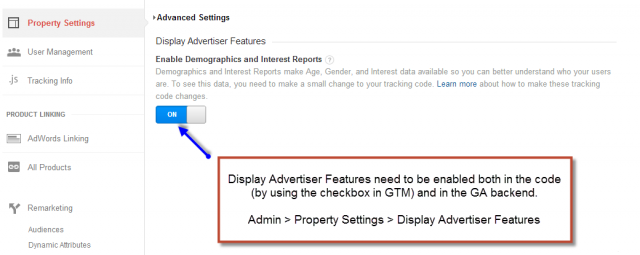
In order to properly configure Google Tag Manager for Universal Analytics, you will need to know what the different settings do and how they relate to the GA Tracking code. In Google Tag Manager, this Universal Analytics tracking code is fully configurable via the interface. Let’s go through the settings. The first two fields are for a tracking ID and whether or not to enable Display Advertising Features. For the tracking ID, I highly recommend using a Constant String Macro. This makes sure that a typo doesn’t creep into your implementation and send your data to the wrong place (or worse, no place at all). Alternatively, you can use a Lookup Table Macro to choose between constant strings. This will allow you to easily switch tracking IDs between development and production environments. Notice how the Lookup Table only allows for exact matches; make sure to list all of your subdomains or cross domains very carefully if you use this option. The Enable Display Advertising Features enables a DoubleClick / Google Analytics integration that provides numerous capabilities. For starters, it enables Advanced Segments to be added directly to Ads Display Targeting Audience Lists. (See this post for further details and examples). Secondly, it enables DoubleClick’s demographic targeting information. This setting needs to be enabled both in GTM (the checkbox shown above) and in the GA Backend.
Settings Configuration
Now onto the different settings. I don’t adjust these most of the time. Of all of them, the most common one to adjust is the Document Path. A good use case is setting the document path as a macro so that you can pass in a virtual pageview for sites that don’t have a “site search” feature that plays nicely with GA. (See my friend Simo’s post here on that topic). Another example is when you would want to use a virtual pageview to measure something such as viewing a PDF or the successful submission of a form that does not lead to a thank you page. I’ll provide a walk-through on how to do a virtual pageview for a form submission later on in this post.
Advanced Configuration
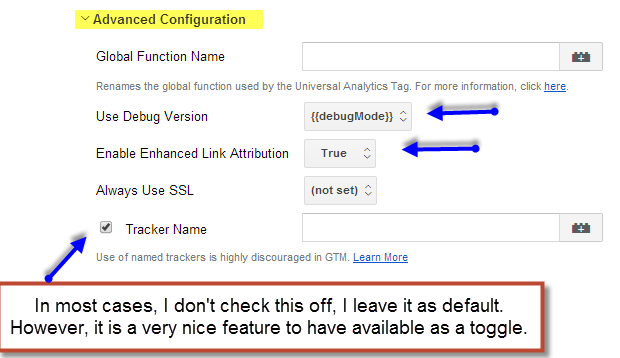
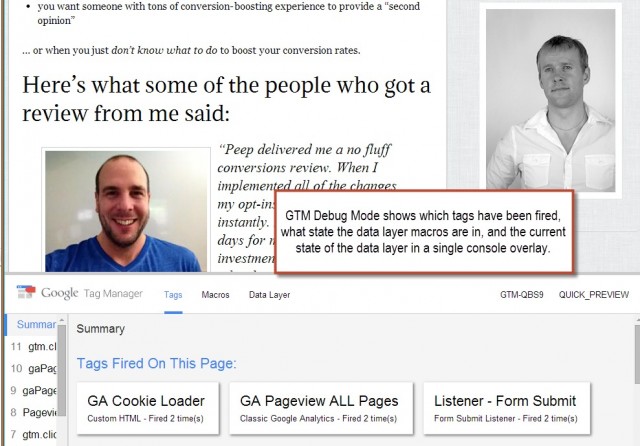
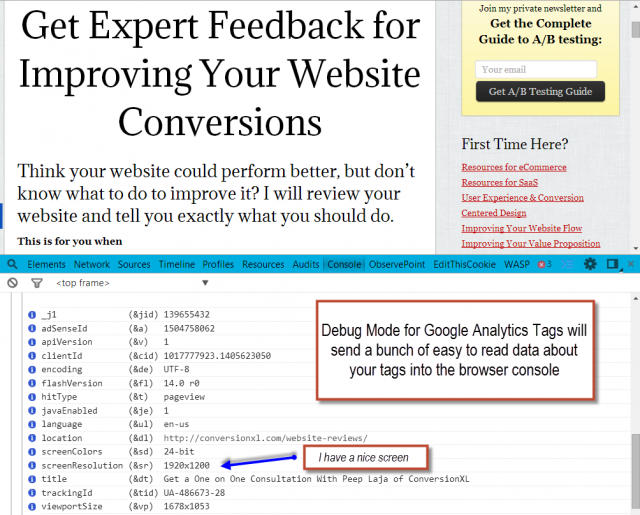
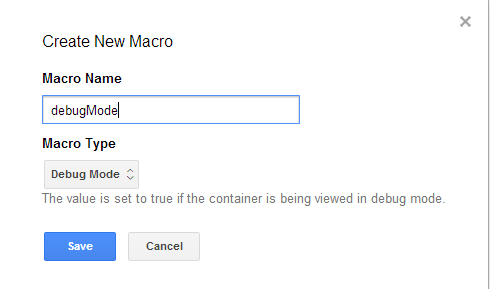
In the Advanced Configuration section, there is the ability to set the Global Function Name. This is a wonderful addition to Google Analytics that many developers have been desiring for a long time. In short, analytics.js uses a function called ‘ga’ to execute Google Analytics commands. It is possible for there to be another global function with the same name on your website, this would certainly cause conflicts. Use this setting in Google Tag Manager to set the global namespace. I always set the “Use Debug Version” setting so that it matches the current value of my debugMode macro. Debug Mode in Google Tag Manager can (and should) be run before publishing tags to see if the tag loaded on the page and the values of the data layer. The “Debug Version” of Google Analytics tags writes a bunch of valuable information to the browser console. This is particularly good for seeing if the correct values for custom dimensions, events, or any other parameter in the hit payload are being sent back to the GA servers. The easiest way to toggle between an enabled and disabled Debug Version of the GA tags is to create a macro of type “Debug Mode” and use that macro for “Use Debug Version” (as seen above). Another feature in Google Analytics that would normally need to be set by adding an additional line of code to the GA tracking script is “Enhanced Link Attribution.” According to Google, Enhanced Link Attribution lets you:
- See separate information for multiple links on a page that all have the same destination. For example, if there are two links on the same page that both lead to the Contact Us page, then you see separate click information for each link.
- See when one page element has multiple destinations. For example, a Search button on your page is likely to lead to multiple destinations.
- Track buttons, menus, and actions driven by javascript.
You’ll need to toggle Enhanced Link Attribution to “true” in Google Tag Manager and enable the setting under Property Settings in the Google Analytics admin. I am not a fan of Google Analytics’s In-Page Analytics reports, and recommend that you use Crazy Egg for an affordable, and better, visualization of on page behavior. The final setting in this section is naming trackers. It is critical to point out that GTM automatically names a tracker with a UNIX timestamp when that tracker is created. That means that there is never same name for giving tracker object on a page. This is important to note as almost all third-party integrations with Google Analytics will end up using a static tracker name. While most third-party integrations have not yet upgraded to the analytics.js syntax, they are certain to do so within the next two years. As such, keep an eye on when you need to be using a named tracker, and when it is okay to let GTM automatically name the tracker.
Cookie Configuration
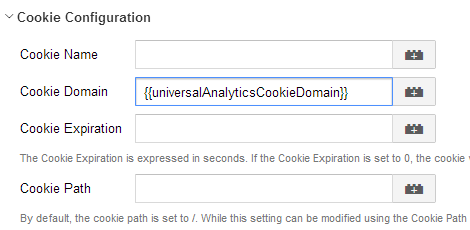
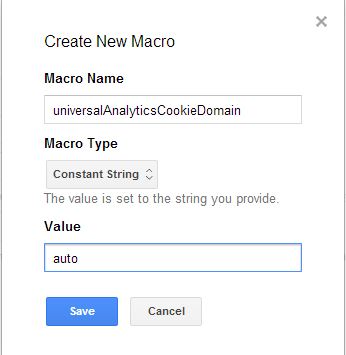
Some of the most common problems that we encounter during troubleshooting or auditing, are issues that relate to cookie integrity. In particular, improper or inconsistent setting of Google Analytics’ cookie scope has caused tracking issues on more websites than I can count. Luckily, Universal Analytics now supports an automated setting that will write the _ga cookie to the root of the top level domain (TLD). This will take care of 95% of users tracking needs, especially as they relate to subdomain and cross domain tracking. I find the cross domain tracking use case particularly helpful, as the cookie scope will automatically be set to the root of whatever domain the tag is fired on. Again, I prefer using a constant string macro just to be absolutely sure that I am setting the value correctly across all of my tags.
Cross Domain Tracking
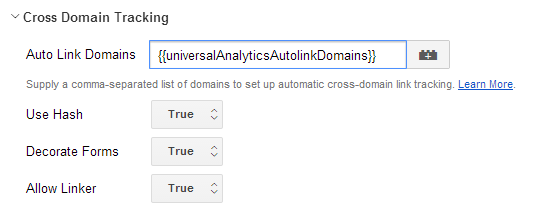
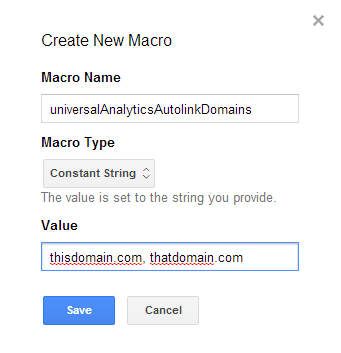
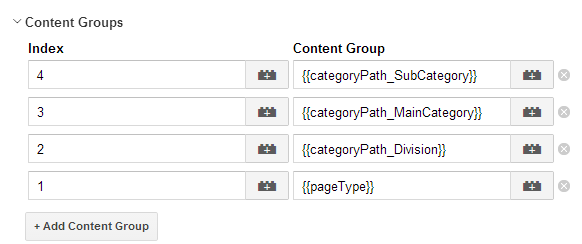
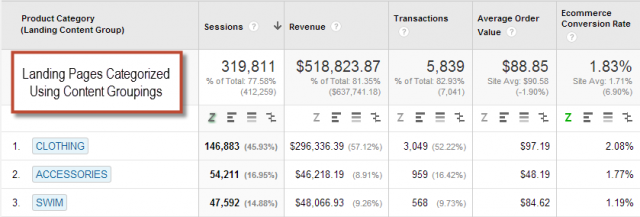
Cross domain tracking has become much easier using Google Tag Manager. One key element of the GA code has always been to set “Allow Linker” to “true”. Now this can be done using the GTM interface. The Universal Analytics javascript API also supports an “automatic” linker function. With GTM, all you need to do is create a comma separated list of the domains. As before, I recommend using a constant string macro. The “use hash” setting will pass the linker parameters to the next site on the document.location.hash (url fragment) portion of the url (after a # sign). The Decorate Forms feature is for situations where a form submit to another domain is the reason you need cross domain tracking (a common occurrence with 3rd party shopping carts). The next configurable area of a Universal Analytics tag are “Content Groups.” Content groups need to be configured in the Google Analytics Admin section as well, configurable for each View. While Content Grouping can be done via URL Extraction or a set of URL based rules, the GTM method is for the “code based” tracking. The great pair of blog posts about Content Groupings were written by Justin Cutroni, so I’m going to keep this section brief. (Highly recommended reading on how to set up & how to use). If you’re not yet using Content Groupings, a few quick screen shots (and the “how to use” post) will probably convince you otherwise: Site Navigation by Page Type or Product Category (pro tip: this post by Josh Braaten)
Landing Page Performance by Product Category
One of the most important features of Universal Analytics is the ability to set Custom Dimensions. Custom Dimensions are meant to describe data in a way that is custom tailored to one’s business model. Additional dimensions, i.e. the rows in GA reports, are able to be configured in a way that is highly descriptive of users, content, merchandise or anything else. Custom Dimensions are essential for creating a data model that is will allow you to answer business questions.
- Do you want to segment your traffic in a way that allows you to distinguish between acquired customers vs. prospects? Custom Dimensions.
- Do you want to segment your traffic in a way that allows you measure the difference in behavior between customers with high, medium, or low lifetime value? Custom Dimensions.
- Are you interested in measuring how long it takes users to sign up for your paid service after having registered for your free trial? Custom Dimensions.
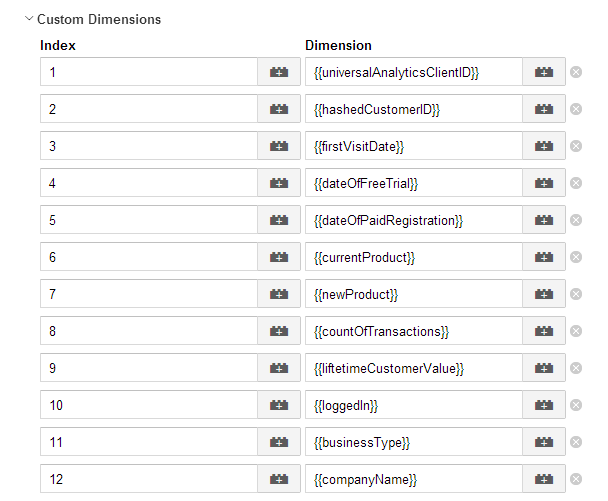
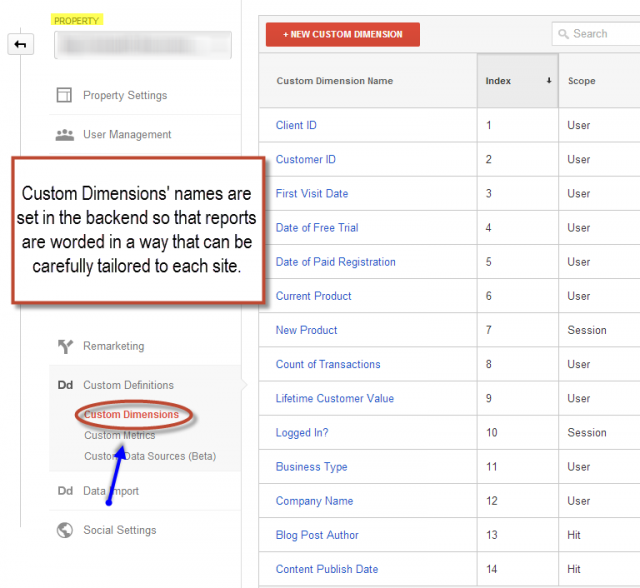
You get the point. For the purposes of our Universal Analytics Tag in Google Tag Manager, we want to use macros to set the values of our Custom Dimensions. Notice how the Custom Dimensions are all set to an Index. That Index is defined in the Property Settings of the Admin Section in GA. The examples I provided above would be appropriate for a GA implementation for a SaaS company. While Google Analytics doesn’t currently measure the amount of time between user actions as effectively as some other tools (KISSmetrics / MixPanel), retention reporting and cohort analysis are definitely possible with GA once you pass in the right date stamps. There are a currently 6 different discreet ways in GTM that you can get the values you need into macros to push the data into Google Analytics during the pageview.
- 1st Party Cookie
- Custom Javascript
- Data Layer Variable
- DOM Element
- JavaScript Variable
- URL parsing
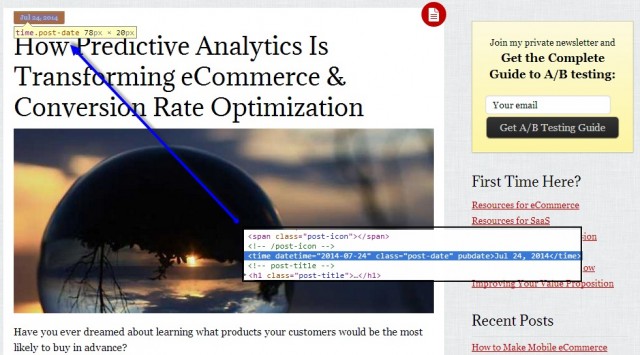
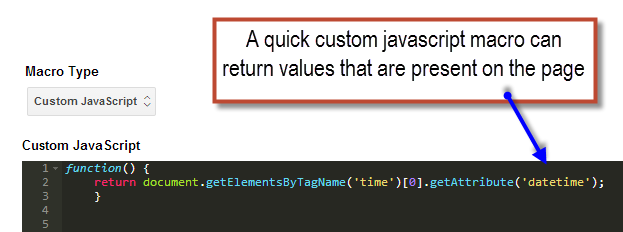
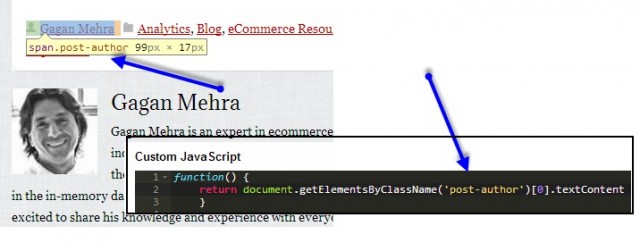
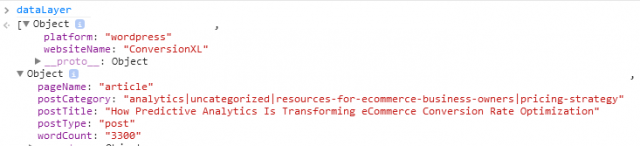
Conceptually, we’ll break this up into 2 categories, scraping the page and reading from values kicked out by the CMS into the Data Layer / JS / Cookies. (See Stéphane Hamel’s Pros and Cons). Let’s say a publisher wanted to capture meaningful data, such as publication date and author, as it relates to a multi-author blog. We’ll use this (wonderful) site as an example. https://cxl.com/blog/predictive-analytics/ Many sites have a publication Year / Month in their URL that we could scrape. Not here. So we’ll get the data from an element that is present on the page. With a simple custom javascript macro, we can grab that value for use in our tags or rules. In this case, we want the “datetime”attribute since it returns the publication date in YYYY-MM-DD format. Same method would work very well for capturing the Author. When checking this site’s CMS powered Data Layer, we see that there are other values that are indeed being made available to GTM as soon as GTM is loaded and ready to go. Segmenting articles by “word count” would be a bit tricky to do scraping the DOM, but the CMS can provide it very easily here. Important note: A site’s particular business needs will need to be represented in the particulars of what data is being captured and how that data is collected. This is particularly true when it comes to configuration of Custom Dimensions. Bonus: If you like audio content, here is an interview I did on Advanced GA Implementations on the Quantified Web Podcast.
Custom Metrics
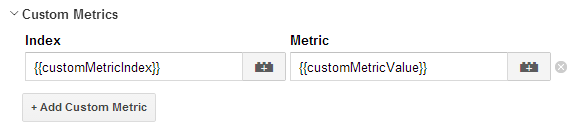
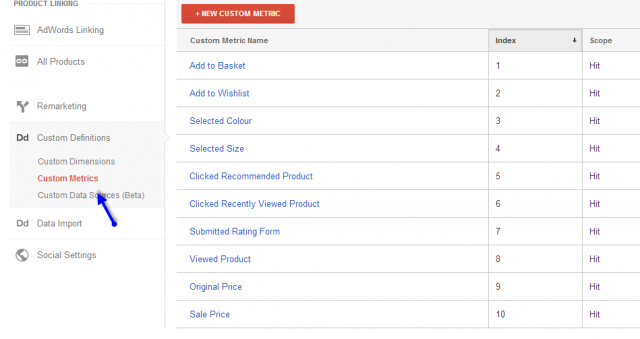
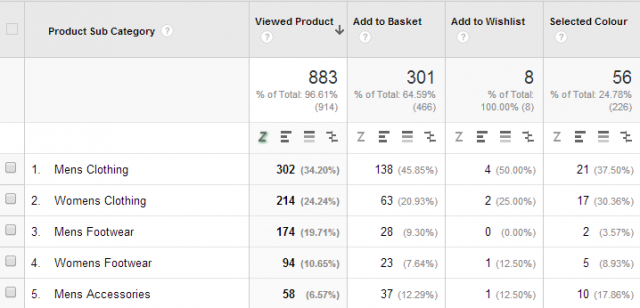
Custom Metrics are great for adding an additional level of depth and flexibility to reporting in GA. I recommend this article by Kristoffer Olofsson to get a good sense about how custom dimensions and metrics can be used to create “Custom Definitions.” In short, custom metrics are best used to provide a “count of” actions that happen on a site, or for measuring additional commerce data (like profit or cost of goods sold). In the following eCommerce example, we extended our standard Event Tracking with custom metrics to allow for the number of times a certain action happened on a product page to be mapped across the entire eCommerce taxonomy. As with Custom Dimensions, Custom Metrics are defined in the Admin section.
Other Fields
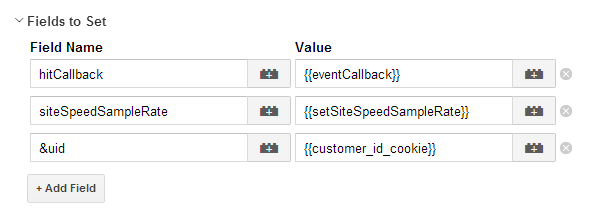
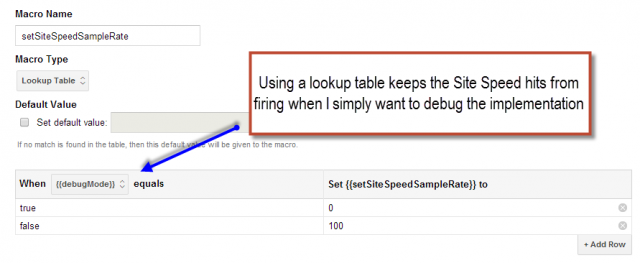
The final section of a Universal Analytics tag in GA you’ll need to configure is the “Fields to Set.” Hit Callback functions are a bit out of the scope of this particular article, but I left it in my screenshot as it can be an important field to set (I’m more than happy to discuss it in the comments). Site Speed Sample Rate indeed is a good setting to adjust, as the default sample (which measures page load time) is only 1%. Lastly, the &uid field is used to set the “User ID”, or a unique identifier for authenticated users that is an integral part of GA’s ability to do cross-device measurement. If you don’t already know how User ID works and would like further implementation considerations, see this article at Analytics Talk.
Conclusion
I know it may seem intimidating at first, but trust me, the amount of time you’ll save in deployments in the long run is well worth it. Like I said, there’s no reason you should have to wait weeks to add something simple like a tracking pixel, and once you’ve got Google Tag Manager set up, you’ll be able to track everything a lot more simply.
Related Posts
-

As an optimizer, it's your responsibility to understand the implementation and analysis of digital analytics.…
-
A/B testing tools like Optimizely or VWO make testing easy, and that's about it. They're…
-

In digital analytics, it’s all about asking the right questions. Sure, in the right context,…
-

This post is not a dry feature-by-feature comparison, nor does it include a winner-take-all verdict.…
